
Last updated May 13, 2023.
Continued from Part 6: Dirty Mods and How to Clean Them, or start at the beginning with Basic Morrowind Installation.
Now that you understand dirty mods and what to do with them, let’s look at another essential skillset for cramming Morrowind mods together in a Get-Along Shirt: merging leveled lists and objects. Basically, you’ll be learning how to find plugin conflicts and fix them by creating a merged patch.
It may seem odd to cover this now when I’ve only had you install a couple of mods, but I’m putting this information in the earlier parts of the guide because I’m going to need to bring up these topics at times in subsequent entries, so it’s better to get the explanation out of the way. Besides, even as the guide changes and grows, you’re still going to need to know how to do this. No matter how many mods or entries I eventually add or remove from the guide, this entry will always be an important part of it. If I placed it at the end, I’d have to keep pushing it forward whenever I wanted to add anything before it, which would be annoying for everyone.
Like cleaning dirty plugins, this is foundational knowledge for anyone who wants to freely explore the experience of modding Morrowind, and the information here is going to come in handy later whether you follow this guide or any other (or just seek out mods on your own). If you’re following this guide and you got here from Part 6, you don’t have to do any of this now, but you can refer back to it when you’re finished installing mods (and I’ll remind you to). Since I’m trying to structure this guide with plenty of stopping points where you can decide you’re finished, it makes more sense to have this entry here so you can come back to it at the right time for you, rather than need to click through a growing number of entries to reach it.
As I said though, if you’re just starting out with this guide, you don’t need to do any of the below steps until later, and you can actually skip reading it till then, too. This entry is long and a bit encyclopedic, but it’s not all “instructions for later;” there’s a fair amount of information in here about how mods work, which could aid you in understanding some of the things we’re going to do. If you’re technically minded, interested, or just like to be prepared, it won’t hurt you to read this now. You’ll have a head start for when you inevitably have to do this at the end.
Right, so let’s get into this mess!
Why Merge Leveled Lists and Objects in Morrowind?
The whole purpose of any Morrowind mod is to change something in the game. But when we have multiple mods trying to affect the same thing, problems arise: only the changes from the last mod in the load order will apply. Intended changes from other mods will simply not function. This is true for both leveled lists and other “objects” in mods; I’ll cover leveled lists first.
Leveled lists determine various things that are supposed to spawn in the world, often dependent on the player’s level — like creatures and loot that only start appearing in the middle or late game as you level up. If you’re interested in mods that add creatures or loot, you’ll definitely install mods that edit leveled lists. And as your load order gets larger, some of those leveled lists are going to end up as casualties unless you know how to make them work together.
If you’re curious, and since you might need a handy reference someday, check out the UESP Wiki’s article on leveled lists for items (and glance at the Morrowind Leveled Lists Category for another perspective on how many there are, and these are for items alone). I’m a bit surprised that UESP doesn’t have a page for creature leveled lists too, but the Elder Scrolls Fandom Wiki does.
But what does it mean when a mod’s changes to a leveled list get overwritten by another? For demonstration purposes, let’s pretend you have the following three nonexistent mods:
- NastyGiantAnts.esp causes hostile giant ants to start spawning in the Grazelands when you reach level 5.
- GuineaPigRage.esp causes hostile guinea pigs to start spawning under the same circumstances.
- WallopingWombats.esp causes hostile wombats to start spawning under those circumstances too.
These three different (fake) mods each add an entirely different creature to the game, so you might think they wouldn’t conflict with one another. But let’s continue with our scenario by saying that these mods all try to add their creatures to the same leveled list — maybe ex_grazelands_lev+0. This causes a conflict, and since the last mod loaded takes precedence, if you loaded them in this order you’d only get the wombats.
The same thing happens with random leveled loot, so if you installed several mods that add new items that you’re supposed to be able to find in such random loot, they would conflict too if there was any overlap between the leveled lists they would be trying to add their items to.
So, whether referring to creatures or items, conflicting leveled lists will cause some of them not to spawn properly. There are a lot of leveled lists, each for different purposes, so if any mod adds to a leveled list that doesn’t conflict with other mods, the non-conflicting items or creatures will still spawn and you may not notice a problem for a while. But then one day you’d realize you never once found a specific weapon that was supposed to appear in bandit dungeon containers while you were between the levels of 6 and 10, and now you’ve leveled past it and missed your chance. (You might not need it by then, but hey. It’s still unintended behavior.)
We get around this by merging leveled lists, which will combine all the leveled list alterations into a new plugin that acts as a patch. Since the patch would contain all the leveled list changes from all the mods and would be placed at the end of your load order to ensure it took precedence, those conflicts would be resolved.
Okay, so what about objects? What are those? They’re basically everything you can interact with, including NPCs, the creatures themselves (not their leveled lists), items like ingredients and armor… yeah, pretty much everything. And changes to objects in mods can conflict just like leveled lists can — also in ways you might not expect.
Let’s say you have three hypothetical mods:
- CheaperEbonyArmor.esp makes ebony armor cost less gold.
- TougherEbonyArmor.esp gives ebony armor a higher armor rating.
- LighterEbonyArmor.esp makes ebony armor weigh less.
Even though these three pretend mods alter different traits of ebony armor and leave the other traits untouched, only the last mod to load will apply its changes — so if they load in the order shown above, ebony armor would weigh less but the other two changes would not work. The fact that they all alter different traits and therefore don’t seem like they should overwrite each other doesn’t matter.
This is just a side effect of the fact that they’re altering the same item, and to try to put it as simply as I can, the game will “know” that LighterEbonyArmor.esp has touched it but left some things unchanged, and will pull the details from the original game files to fill in those unchanged traits, rather than pulling them from any previous plugins loaded above it. So, plugins that alter the same objects aren’t able to see each other and “cooperate.”
The same thing would happen to characters (one mod changes appearance, another adds dialogue, another adds something else, etc.) and pretty much any other “object” in the game. But we can fix this by (you guessed it) merging objects. They’ll go into the patch too, along with the leveled lists.
Creating a merged patch may sound like an annoying and tedious task, but thankfully we can usually accomplish it with automated tools. Once in a while, you will come across a mod that can’t have its parts merged in this way, but these are relatively rare and usually other workarounds or instructions will be provided. If the information isn’t already on the mod page, I’ll walk you through it myself.
One more thing before I move on to the tools and processes: please note that we are not merging the mods themselves — merging plugins is an entirely different animal, and we’re not approaching that yet.
Finding Mod Conflicts
When creating a merged patch, you usually just include all your mods while generating it. But knowing which mods specifically conflict (and how) is valuable information. If you’re using very few mods, you may not even need to make a merged patch at all, but the majority of mods will require this patch so you’re likely to encounter the need for it very soon. Knowing how to look at mod conflicts is crucial for seeing whether your load order has reached the point where it needs a merged patch.
Besides that, it’s always better to know about a mod conflict in advance rather than to discover it through borked gameplay (so you can fix it ahead of time), and I’ll certainly tell you about any conflicts during the course of this guide. Mod conflicts are also often described on their download pages, sometimes complete with instructions for fixing them (or even their own patches!). But I can’t know everything about every possible mod combination, and not every mod in the world is perfectly documented, so you should know how to check for conflicts yourself, too.
A quick way to see the number of changes in a mod is to open Wrye Mash and right-click the mod in the left panel. Select “Statistics” from the menu that pops up, and a little window will open with a list of all the records altered or added by that mod. Clicking “Type” will sort them alphabetically (or reverse). If you see “LEVC” or “LEVI” anywhere in there, it means that mod has leveled lists, which is an instant signal that this mod must be included in a merged patch to work correctly. If you see other types of records in that list, you’ll get an idea of how many other changes there are, but it only shows you the quantity of them — not what they do. With leveled lists you only need to see that they’re there to begin with, but to understand everything else, you’re going to need to look inside the mod to find any conflicts.
To see mod conflicts, we are going to use a program called TES3View. The installation process is a little weird, but like everything else in this guide, manageable with good instructions.
Are You Using MO2? I Have Good News Again
If you followed my Using Mod Organizer 2 with Morrowind – Tutorial, you’ve already installed TES3View. You can skip these installation instructions and move down to “Using TES3View to Find Morrowind Mod Conflicts.”
But if you’re not using MO2, then don’t skip any of this!
Installing TES3View
Start by visiting TES5Edit Releases on GitHub. TES5Edit is actually a program called xEdit that works with multiple Bethesda games, and normally offers limited plugin editing features (hence the name), but only allows viewing of Morrowind plugins (no editing, yet). Support for Morrowind is still being worked on, and xEdit was backported from later Bethesda games in order to work with Morrowind at all. So what we need is a version that is 4.1 or later, which is luckily right at the top of that GitHub page.
- At the top of that GitHub page you will see “xEdit 4.1.4c EXTREMELY EXPERIMENTAL” marked as pre-release. If there’s a different one at the top, it’s likely xEdit has updated since I wrote this (and I’ll edit accordingly when I notice), but currently this is the one you need for Morrowind. (Other 4.1 versions should work too, but I haven’t found a reason not to use the one listed.) You may need to click the “Assets” subheading to expand the view of the downloaded files. In there, click on xEdit.4.1.4c.EXTREMELY.EXPERIMENTAL.7z to download it.
- Find your main Morrowind folder (yes, where Morrowind.exe is) and create a folder inside it called TES3View.
- Now unzip the archive you just downloaded into a separate folder somewhere; you don’t need everything that’s inside it. You’ll see contents like this:
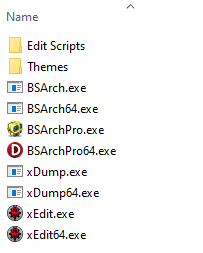
- Move only the following files/folders into your new TES3View folder:
- Edit Scripts
- Themes
- xEdit.exe
- Your TES3View folder should look like this:
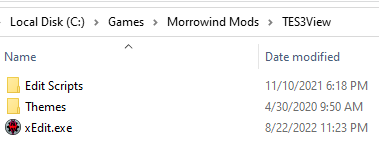
Ignore the filedates and the directory path in the above image; the important parts are the contents: the two folders and xEdit.exe. Also note that you do not want xEdit64.exe regardless of your operating system; xEdit.exe is the one you need for Morrowind. - Now you must select xEdit.exe in the TES3View folder and rename it to TES3View.exe in order for it to work with Morrowind, like this:

- You can now delete the rest of the .exe files that you didn’t move into the TES3View folder. You won’t need any of those for Morrowind.
Once you’ve done that, congratulations! You’re ready to use TES3View.
Using TES3View to Find Morrowind Plugin Conflicts
If you skipped the above installation instructions because you already installed TES3View while setting up MO2, this is where you need to start reading again.
If you’re just starting out with your modding journey (e.g. you’re following this guide and have only installed a couple of things so far), you don’t really need to hunt for mod conflicts right now. But I still want to show you how this works because you’re likely to need to know how to do it if you start installing mods from outside of this guide.
TES3View doesn’t only display mod conflicts, either — it actually displays almost all the changes in a mod’s .esp or .esm file whether they conflict or not. So you can also use it to take a quick look inside a mod to see what it changes. You should know what mods do before you install them (and that’s one reason I’m here) so if you see something in TES3View that looks out of place, you should be able to identify it.
For example, if you install a mod that adds a free weapon to the Census and Excise Office in Seyda Neen, that mod should only touch the Census and Excise Office cell (basically the location as it’s defined in the game data). If you notice in TES3View that there are also a bunch of changes to other locations, which shouldn’t be there, the mod either has undocumented changes or it’s a dirty mod (which I taught you about in Dirty Mods and How to Clean Them).
As another example, say the free weapon is meant to be a unique steel longsword. Looking at the mod in TES3View should show you that a new weapon record was created in the mod with the unique qualities attached to it that were chosen by the mod creator. If instead, you see alterations to the regular steel longsword, you’ll know that this mod accidentally applied all those qualities to every steel longsword in the game by editing the original record. This is a mistake you usually only find in mods created by beginning mod makers, but it’s important to know it can happen, especially if you start using brand-new, untested mods from creators that are still learning.
But now let’s get back to finding mod conflicts.
When you run TES3View, you’ll be greeted with a “What’s New?” window that you can opt out of seeing again until updates happen; it’s up to you if you do this. Read through it if you like, but you can skip it too. Clicking “OK” on this window will bring you to a “Module Selection” window.
The “Module Selection” window is where you choose the mods you want to look at in TES3View. Here’s a screenshot — note that there are loads of mods visible here, but that’s because I have a bunch of stuff installed that I’m testing for inclusion in this guide. If you’ve been following along with this guide and this is your first time seeing this entry (i.e. you’re not coming back to look for conflicts and create your merged patches after finishing modding) and open TES3View with your current modlist, you won’t have nearly this much:
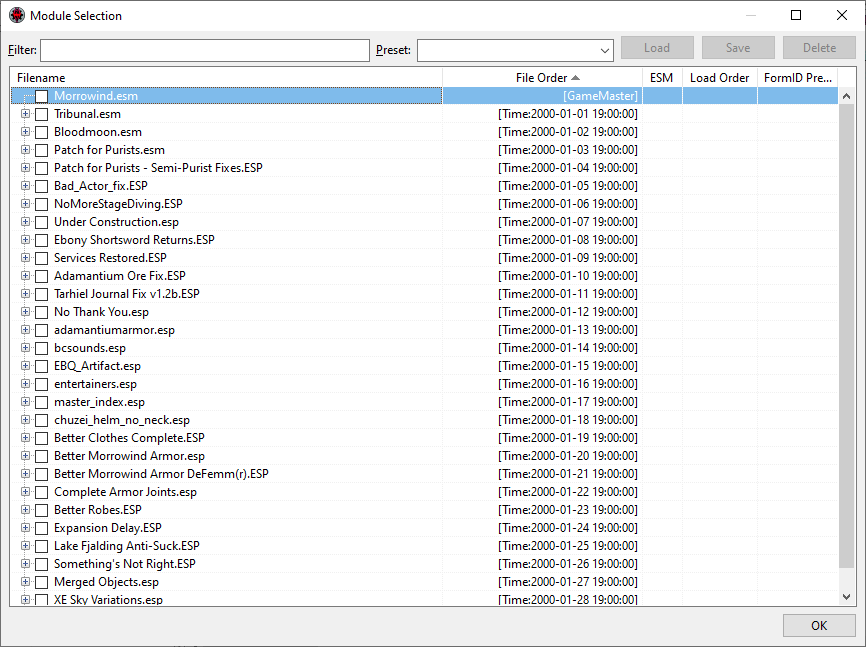
To show you how it works, I’m only going to select mods I’ve already covered in previous steps of this guide (in case you’re reading straight through, I’ll use something you’re familiar with). When we installed Patch for Purists, it came with a couple optional .esp files: Patch for Purists – Book Typos.ESP and Patch for Purists – Semi-Purist Fixes.ESP. I’m only using the Semi-Purist Fixes one, and I’ll load it up alongside Patch for Purists.esm (the main PfP file).
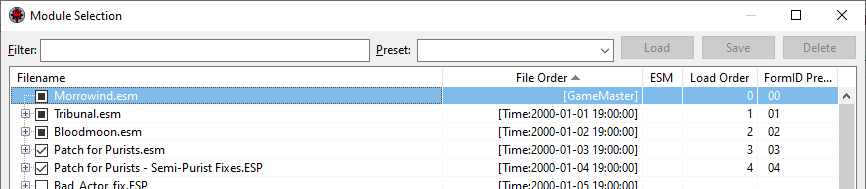
To select a mod to be loaded for comparison, click the checkbox to the left of its filename. TES3View will also load the master files the selected mods depend on, highlighting them by putting a black box into the checkbox. Patch for Purists.esm depends on all three of the Morrowind, Tribunal, and Bloodmoon masters, so those will all need to load as well and are highlighted as seen below.
Click “OK” at the bottom right corner of this window and TES3View will begin loading the mods for comparison. This can take a while depending on how many mods you’re trying to view. Since it has to load the game’s own master files too (Morrowind.esm etc.) it will always take at least several seconds.
If you do want to load all your mods (and you will, eventually) you can right-click on them to bring up a menu with some selection options, including the ability to select or deselect all of them.
When it’s done, you’ll see “Background Loader: finished” at the bottom of the right-hand pane, and on the left side you’ll see the mods that you loaded.
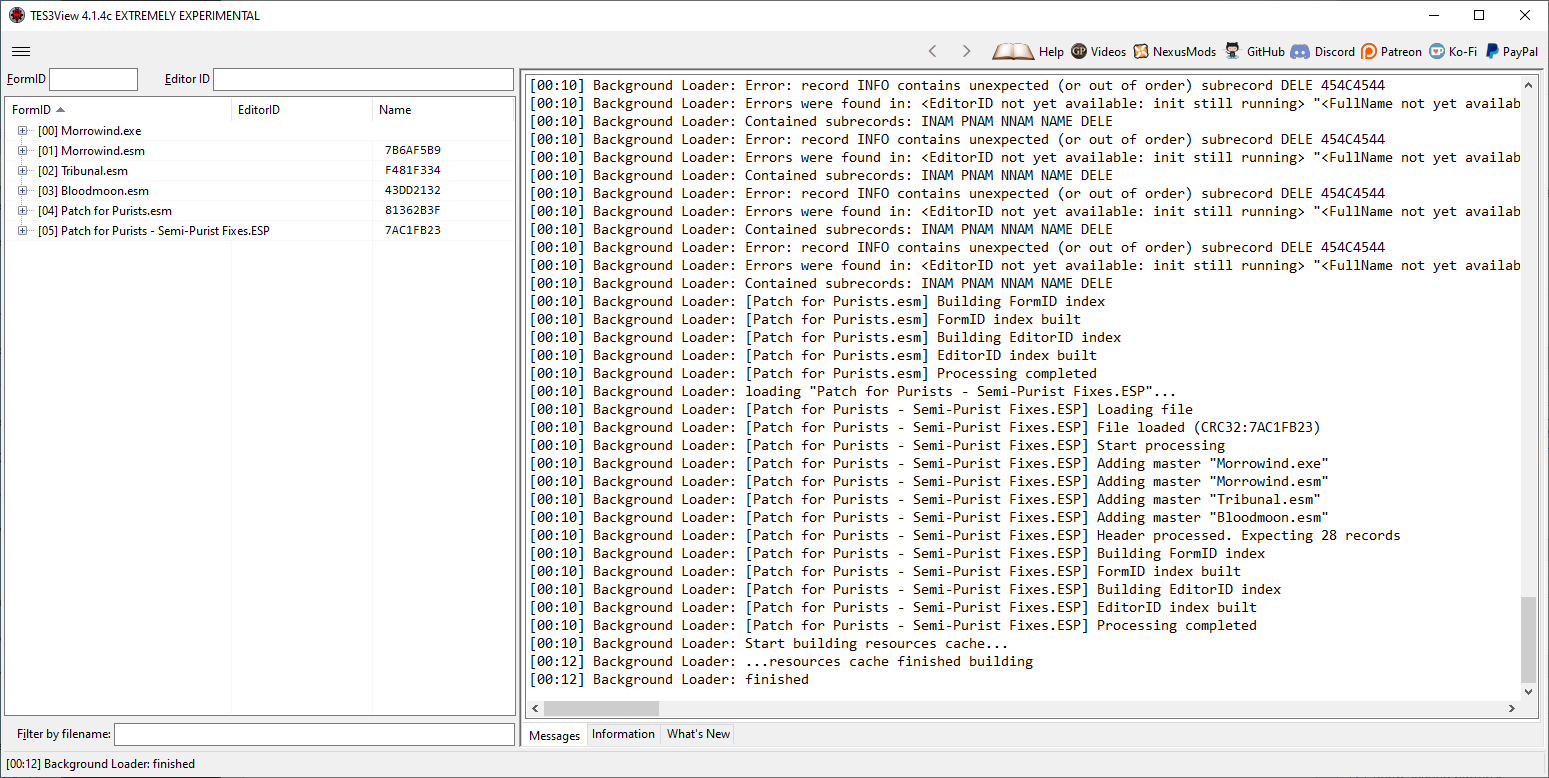
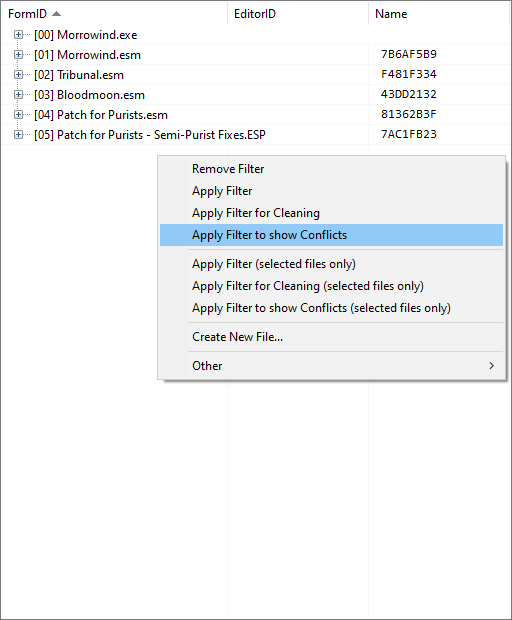
You can click the little plus boxes next to the mods to expand them and look inside, but that will show you everything in the mod, which is a lot more than you need when we’re currently looking for file conflicts. To see those, right-click somewhere in the empty space in the left pane and select “Apply Filter to show Conflicts” from the dropdown menu that pops up.
Once the filter is done applying, you can now expand the mods by clicking on their plus boxes and see only the records that conflict with other mods you’ve loaded. Click on any of those in the left pane to see the details in the right pane. They will be organized from left to right according to first-to-last load order.
In the below screenshot, I’ve expanded Patch for Purists – Semi-Purist Fixes.ESP on the left side, and selected the first record under the subheading “Book.” On the right side, the conflict is highlighted in red and an intended override is highlighted in yellow.
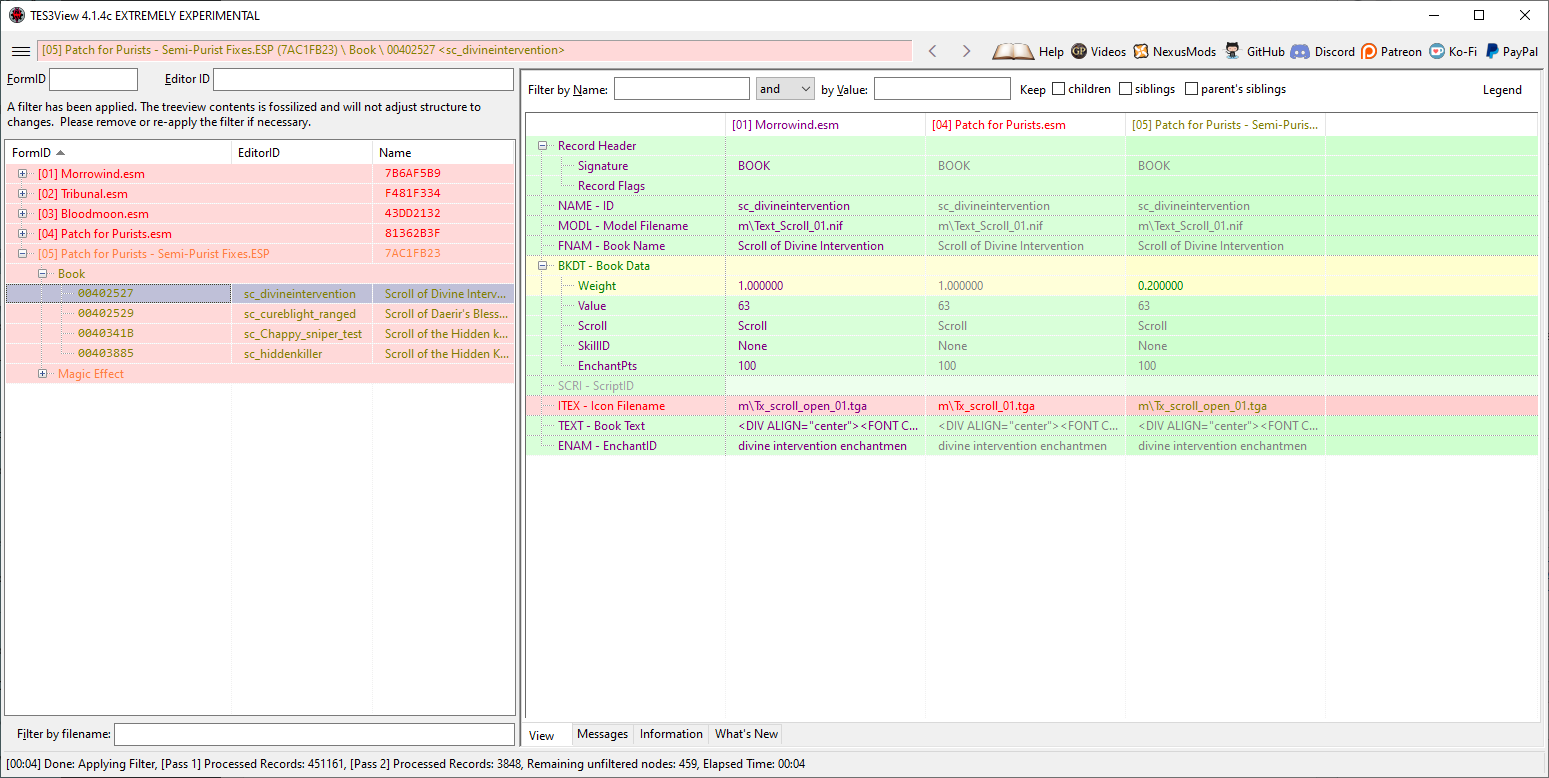
Once you see a screen like this, you can right-click in empty space on the right-hand side to bring up another menu with an option to “Hide no conflict and empty rows” which can help you find conflicts and overrides faster in complex mods by hiding everything else. In the screenshot above, selecting this option would hide everything except the yellow and red row.
Now, Semi-Purist Fixes is supposed to override some stuff from Patch for Purists — look at the row highlighted in yellow and you’ll see that the weight of this scroll is changed from 1.0 to 0.2, making it lighter so it will weigh the same as other scrolls. But if you look at the row highlighted in red, you’ll see it’s also undoing a small graphical fix that PfP made.
I was expecting the weight change, but not this graphics conflict! If I wanted to, I could fix that myself in the Construction Set or another tool, but I’m not anywhere near ready to show you how to do that, and this is a barely noticeable thing anyway that I probably wouldn’t even have realized was happening if I hadn’t seen it in here. I checked with Half11, the creator of PfP, and he confirmed that this is a known error that will be corrected in the upcoming 5.0.0 update. For now, I’m just not going to worry about it because I can see it’s not breaking anything important.
Anyway, the above screenshot is a good example of what TES3View looks like and how you can use it to display the information in plugins side-by-side. As you get more accustomed to Morrowind modding, you may even enjoy poking around inside TES3View to look at what a mod is doing. And if you download a plugin you’re suspicious about (it’s untested, or it’s super old and there’s no feedback anywhere, or you worry it’ll cause bugs) you can look in TES3View to see if any problems jump out. Remember that you can look at everything inside the mod before you apply the filter that will hide everything but the conflicts.
The biggest caveat with using TES3View is that it can only load 256 files at once. This used to be the hard limit of how many .esm and .esp files you could apply to your game, but modern tools have been able to circumvent this (like Wrye Mash in the previous entry raising the supported number of plugin files). Hopefully TES3View can be upgraded to load more, and to enable the type of minor editing that can be accomplished with other versions of xEdit like TES5Edit for Skyrim. In the meantime, I’ve always had the habit of trying to limit my number of plugin files, and there’s no restriction on the number of mods you can use that don’t have these. Morrowind can load graphics replacers without a plugin as long as they’re set up with the default folder structure (like Uncompressed Vanilla Textures that we installed in Part 5), and many MWSE mods don’t require a plugin file either (that’s kind of part of their point). You could still also use TES3View by loading only part of your load order at once but that makes things more confusing if you’re trying to find any and all conflicts across the board. It’s also possible to merge the plugin files themselves, but we’re not anywhere near that point in this guide.
TES3View also can’t show you conflicts that exist outside of plugin files — for example, it can’t show you when a texture file from one mod is going to override the same file from another mod. MO2 can give you this information though, and I believe Wrye Mash can as well. If you’re installing manually, your computer will also warn you when one file is going to overwrite another, and in this guide I’m including all the information about which files you shouldn’t let overwrite.
Finally, TES3View can’t inform you about landscape changes in mods; changes to the actual ground such as adding hills and such. There are other tools you can use to find landscape conflicts (and merge them as well) but those will be covered in a later part of the guide. I’m not going to direct you to install anything with conflicting land changes anyway, so you don’t have to worry about this yet.
Mod Conflicts, Load Order, and the Merged Patch
Right, so now that we’re done with the TES3View tangent, let’s get back to the major reason we’re looking at it right now! The main reason I just showed you how to look at mod conflicts is because it helps us figure out a couple of things:
- Which mods should load before others
- Mods that definitely need a merged patch
I mean, in most cases you’ll want to have all your mods selected when you create your patch, but some would still work even if they weren’t merged (albeit some only partially). When I was giving examples with lists of three fake conflicting mods earlier, though, remember how only the last one in those example lists would work? The first two in each list wouldn’t do anything at all. So those types of mods are the ones that need a merged patch the most, since they’d otherwise be completely invisible to the game if buried in the middle of your load order.
Load order matters for creating a merged patch too, not just for loading the mods into your game. When mods have conflicting records, you already know from reading this guide that the mod that loads later will take priority in the game. The same is true for creating a merged patch — if multiple mods edit the value for same exact records, the changes from the latest mod in your load order will be the change retained in the patch.
Let’s bring back the pretend list of ebony armor mods:
- CheaperEbonyArmor.esp makes ebony armor cost less gold.
- TougherEbonyArmor.esp gives ebony armor a higher armor rating.
- LighterEbonyArmor.esp makes ebony armor weigh less.
Those three would smoosh together perfectly into a merged patch because they all edit different traits of the ebony armor. But now let’s say you add a fourth mod to this list:
- BadassEbonyArmor.esp renames ebony armor to “Badass Armor” and gives it a higher armor rating.
If you added this to the end of the load order, making it the fourth mod in the list, the armor rating change would overwrite the one from TougherEbonyArmor.esp (which would then be rendered pointless, since armor rating is all it changes). To get the armor rating change from TougherEbonyArmor.esp you would need to place it after BadassEbonyArmor.esp to ensure TougherEbonyArmor.esp wins the conflict. Then, your merged patch would contain the desired changes from all four mods.
This is one reason why, if you build up a load order and then decide to alter it later, you can’t just stick all the new mods at the end of the list. The other reason is that some mods will still conflict in your game if loaded in the wrong order (even with a merged patch). When adding new mods to an existing load order, you’ll have to slot them into the right places. Leveled lists don’t suffer from conflict loss in the same way, so if you merge a bunch of leveled lists mods into your patch you’ll get everything from all of them, but those mods will still need to be loaded in the right order for other reasons.
Mlox
There is a tool called Mlox to help you organize your load order, but I already told you to skip it for now (when Wrye Mash asked for an Mlox directory). I’ll cover Mlox later, but my main reasons for putting it off are:
- You won’t need it until you’re done with this guide and start hunting down new mods on your own.
- You should learn about load order and how to sort it yourself first, so you’ll have a better understanding in the future of what Mlox is doing and the occasions when a suggestion it gives you might be wrong. You need to know more so you know when to trust it.
- I’ve already made you install enough weird programs and Mlox is something that can wait for later.
Personally, I haven’t used Mlox in years, although I was unaware for a while that it was getting updates again, so I’ve recently given it another look. There was a time when it was basically a recipe for disaster since everyone told everyone else to use it even though it was slowly getting more and more broken, but it’s been rescued now. Whew!
If you do decide you want to try Mlox, keep in mind I won’t be explaining it myself till near the end of the guide when I advise you on picking mods yourself without a guide to, well… guide you, so you’ll have to rely on the Mlox documentation on GitHub or seek other help elsewhere till then, and you will also need the updated Mlox rules by Danae which will download automatically when you run Mlox. You’ll also need to know how to customize rules for yourself.
Anyway, let’s move on and see how to create that merged patch I’ve been talking about!
Making Your Merged Patch
Right! So now that you understand a bit more about how Morrowind mods work and why a merged patch is necessary, let’s get to creating it. Please note that you don’t need to do this until you’ve finished installing the mods you’re going to use, but you can also recreate this patch later at any time if you do add more mods. In later parts of the guide, when we reach different stopping points where you may decide you’re finished adding mods for now, I’ll remind you to come back here and do this.
We are going to use an automated tool to perform the actual merging. It will create an .esp files that will serve as the patch — it’s basically a mini-mod.
TES3Merge
Generally, Wrye Mash’s “Mashed Patch” feature used to be the solution for merging objects, then TES3cmd was able to do it better with its “MultiPatch” function. But now, we have TES3Merge, a newer tool made specifically for this which has rendered both previous merged patch methods obsolete.
Now we’re going to install TES3Merge. I know, I know! I literally just said “I’ve already made you install enough weird programs” but this is the last one and it takes like two seconds.
If you already installed TES3Merge during my MO2 tutorial, just skip down past the three numbered installation steps here. If you’re not using MO2, do the following:
- Download .NET 6 Runtime (look for .NET Desktop Runtime 6.0.16 on that page and click the x64 under Installers).
- Manually download TES3Merge.
- Extract the archive and put its contents into your Morrowind folder.
MO2 USERS START PAYING ATTENTION AGAIN. Now we all have TES3Merge installed, yay!
Let’s create our final merged patch.
- Make sure your load order is correctly activated and in the right order.
- Run TES3Merge (if you’re using MO2, run it through there).
- A command line window will pop up. When it’s finished, a message saying “Press any key to exit…” will appear at the bottom, so just hit a key when you see that.
- You now have a brand-new Merged Objects.esp! Put this at the very end of your load order and activate it.
- Yes, Merged Objects.esp always needs to be at the end of your load order after everything else, even if another mod’s instructions say “put this mod at the end of your load order.” There are VERY FEW exceptions.
Congratulations, your objects and leveled lists are merged! You can even open Merged Objects.esp in TES3View to see everything that got merged inside it. There is an excellent example TES3View screenshot on TES3Merge’s Nexus page showing the results of a pair of mods having their objects merged.
Final Notes on Merged Patches
Now, once in a while you may encounter a mod that has a change you don’t want merged into the patch. This is pretty rare, though, and I’ll cover how to fix it later. It’s another thing you won’t need to know how to do until you have more mods installed or you’re ready to go out on your own. I’ll bring it up when it’s time.
I want to mention that there is also a tool for merging changes to landscapes: Merged Lands. However, simply merging landscape changes via automation won’t necessarily produce good results — sure, it will mash the land changes together, but it doesn’t account for anything but the actual ground, so you could end up with buildings, items, and NPCs buried or floating in the air. It also doesn’t have any sense of aesthetics or geology so if two mods make significantly different changes to the land in the same spot, the results can be ugly or even nonsensical. Landscape merging patches are best done via an actual human mod creator sitting down with the Construction Set and smoothing everything out as needed; they can move buildings, people, and everything else, and make sure the landscape appears natural. So Merged Lands is currently an interesting tool, but it isn’t yet ready to sit alongside TES3Merge as a recommendation for every modder.
Next, in Part 8, we’ll install some more crucial bugfixes and basic (sensible) changes to complete our foundational modding setup!
And here’s an important note from May 13, 2023: This is a slightly annoying part of the 2023 update — there is an old part 8 on this blog somewhere that is outdated now (and about a different topic, nonetheless) because I’m in the middle of updating everything. There is still one more 2023-ready entry, temporarily numbered as “Part 7.5” because I’m moving it later in the guide and don’t want to have to renumber everything more often than I have to. You can still check it out — it’s Basic Morrowind Quality of Life Improvements — but keep in mind it’s going to slide further into the guide as I put everything before it that needs to be, and some of the information in that entry may change to reflect its new later position. And while the information there is updated, I will probably still shift some of those mods around and add more to it in order to keep things more organized. Anyway, the new real Part 8 will be up soon; just letting you know!
You can also keep an eye on this guide’s progress at my main Morrowind page.
