
Last updated May 13, 2023.
Continued from Part 5: Patch for Purists and Load Order, or start at the beginning with Basic Morrowind Installation.
Before we go any further, there are a couple more technical aspects to modding Morrowind that you need to know about. Understanding these things will help you build a Morrowind load order that works properly and remains as error-free as possible, regardless of which mods or modding guide you use. The first is the concept of dirty mods, and how to clean them.
And hey, I’m sure you’d like to hurry up and finish installing mods so you can get into the game! I sympathize, I really do. But you really need to know about dirty mods, because they’re terrible.
What are Dirty Mods?
No, it’s not what you’re thinking — although those do exist. The dirty mods I’m talking about now are much more mundane and not at all sexy.
A dirty mod (or plugin, addon, whatever you want to call it) includes incorrect information that makes unintended changes to the game, outside of what it’s actually supposed to do. This doesn’t mean the mod creator sneaked in a bizarre undocumented change (that’s a whole different problem, but these at least get called out very quickly by the community). Rather, it means that certain types of junk got into the mod by accident and can cause all kinds of conflicts and other problems.
There are a few ways this can happen.
Duplicates, Redundant Information, and “Identical to Master” Records
First, Morrowind’s Construction Set has bugs of its own, which shouldn’t come as a surprise at this point. Second, it’s also very fiddly and can retain too much information about things the mod creator did (or sometimes just looked at, it seems) even if they undid those changes later. It’s really kind of a nightmare if you’re unprepared.
It’s all too easy for a creator to accidentally include duplicate information in their mod, including objects, records, even things like water height information that practically nobody needs to change, and more. It’s also possible to have an “oops” moment and drop something into the mod without meaning to. Sure, you can remove it, but the Construction Set remembers what you did, and it won’t easily forgive you. If a mod author makes an accidental change and then reverts it, the Construction Set will still consider the thing in question to be “changed” and will include it in the mod. It’s not important right now for you to understand exactly what “objects,” “records,” and such are, but they all cause problems when redundant duplicates of them are accidentally included. At best, you get a plugin that’s larger in filesize than it needs to be, but the damage is often more severe. You can get copies of things, and worse — you can find changes from your other mods being reverted.
Why? Well, remember that mods load into your game in a certain order, not all at the same time, and any mod that loads later will take precedence over earlier ones. (That’s why load order is paramount, as I explained in the previous entry.) So let’s say you’re following this guide and have Patch for Purists installed. At some point you decide to install a new mod that adds a fun weapon or something like that — let’s call it FunWeapon.esp. You are smart enough to know that it needs to load after Patch for Purists and you set up your load order accordingly. However, FunWeapon.esp contains several dirty references to parts of the game it isn’t actually supposed to change, because the mod author poked around too much in the Construction Set. Those references are exact duplicates of the ones found in the base Morrowind.esm master file. When FunWeapon.esp loads up after Patch for Purists, it will bring all its duplicates from Morrowind.esm into your game and wipe out PfP’s fixes in the affected areas. Oh no!
Now picture having dozens of similarly dirty mods in your load order, and it’s easy to imagine how many things would break all over the place. They’d be overwriting each other and everything else, left and right, with stuff that shouldn’t be there. This is the type of havoc dirty mods can wreak. Worse yet, it’s a quiet havoc, so you may not even know things are broken until you’re days into a savegame and starting over would be a real bummer.
There’s another way mods can be dirty, too…
Evil GMSTs
The other reason plugins can get dirty is if the creator built their mod using only the original game’s file (Morrowind.esm) as the master, and not the Tribunal and Bloodmoon expansions (Tribunal.esm and Bloodmoon.esm). This is because when Tribunal and Bloodmoon were released, they came with new “game settings” (GMSTs) as part of altering how the game functions. These are not the type of game settings you can normally see (like an in-game Options menu), they’re internal settings like names of magic effects. Tribunal added 11 GMSTs and Bloodmoon added 61. This is all perfectly fine for Morrowind, but it created a serious bug in the Construction Set.
The Construction Set was patched along with the expansions, to bring it into line with them. But if you had Tribunal (and later Bloodmoon) installed, and made a mod that only relied on Morrowind.esm as its master file, the Construction Set would pile wrong versions of all 72 of those GMSTs into the mod. Without the expansion(s) loaded, the CS would look for the GMSTs it was patched to use with those expansions, and not be able to find them, so it would throw them in with incorrect values. This led to broken mods and corrupted saves, which is why the community named them “Evil GMSTs.” You can read a more in-depth technical breakdown here, if you’re interested.
This issue isn’t so prevalent anymore, because it’s rarer for people to only have the base Morrowind game, but some mod creators still use only Morrowind.esm as a master so their mods will not require Tribunal and Bloodmoon. A lot of really old mods are still popular too, so you may still encounter Evil GMSTs from time to time.
Side note, GMSTs themselves are not inherently evil. After all, they’re just elements of the game that serve an actual purpose. Some mods actually require a GMST change to work, and you don’t need to run for the hills if you see a mod with a GMST — the GMSTs that are evil are very specific ones that are easy to target for cleaning out. You can see a list of them here (but don’t worry, you are not going to have to search for and fix them yourself. There are tools to clean them up for you).
How to Clean Dirty Mods
Cleaning a mod involves removing everything in it that’s identical to the corresponding things in the master file(s) (because if they are identical, then it’s obvious no change was intended and they were left in by mistake) and also deleting the Evil GMSTs, if any. Thankfully, most plugin authors clean their mods before releasing them, but once in a while a dirty one still slips through. In that case, it’s easy to clean them yourself!
Are You Using MO2? I Have Good News
So, guess what? If you followed my Using Mod Organizer 2 with Morrowind – Tutorial, you already have everything installed that I direct you to install in this entry — TES3cmd and Wrye Mash. You still need to read this entry to understand how to use them to clean mods, but you’re ahead of the game by already having them installed. Just like I said you’d be.
I’m not sure whether an awkward double thumbs up or equally awkward finger guns would be more appropriate here, so just smile in satisfaction at how prepared you are, and let’s move on. Unless you feel like reading installation instructions again for some reason, you can skip down to the section labeled “The Mod-Cleaning Process.”
If you are NOT using MO2 then don’t skip any of the following.
Cleaning Mods with TES3cmd
Download tes3cmd.exe from here. You might need to click the “Assets” section to expand it so the .exe becomes visible. Put the downloaded .exe in Morrowind\Data Files. Don’t be concerned by its description as being “for testing,” “unstable,” or “lightly tested,” it’s best for what we need it to do. If we only ever touched “stable” things, we wouldn’t even be playing Morrowind.
There are a couple of ways you can run TES3cmd: via command line, or through Wrye Mash. Wrye Mash is much easier, and you should use it anyway, but if you really want to run TES3cmd via command line, read its documentation and check this excellent resource from the Project Tamriel team (at this point you really only need “Getting Started” and the “Cleaning” section under “Common Use Cases”). The TES3cmd Wiki is also good to have on hand.
However, since I find running TES3cmd through Wrye Mash to be much more convenient, I’ll go over how to do that now. (I’m sure there’s someone out there who would rather run it through command line instead of a beautiful and simple dropdown menu in Wrye Mash, but I’m not that someone.)
Using TES3cmd with Wrye Mash
If you haven’t installed Wrye Mash already, follow these steps:
- Open the “Files” tab on its Nexus page (linked above) and manually download the file labeled “Wrye Mash 2019 x64 – Installer.”
- Run the installer and install Wrye Mash into your Morrowind folder (where Morrowind.exe is). If you’re not using MO2, I recommend creating a desktop shortcut because Wrye Mash installs in a weird place (it’ll be in a folder called “Mopy” in your Morrowind folder). There’s no need to run Wrye Mash at the end of the installation because we’re going to drop some updated files on top of it before we open it.
- Go back to the Wrye Mash Nexus page and look under “UPDATE FILES” on the “Files” tab. Manually download “Wrye Mash 2021 – x64 – beta6 – manual installation archive.”
- Unzip this archive and put everything that was inside it into the Morrowind folder (with Morrowind.exe), allowing all overwrites.
- If you’re following these steps it’s likely because you aren’t using MO2, so you probably don’t have a dedicated folder for Morrowind modding tools yet. Create this folder now, anywhere but Program Files — I like to put it in C:\Games. Name the folder “Morrowind Mods,” “Morrowind Tools,” or something like that. I will use the name “Morrowind Mods” in these instructions.
- Run Wrye Mash, either from your desktop shortcut, or by running mash64.exe from inside Morrowind\Mopy. This will start an installation wizard.
- During installation, you will be asked for your Morrowind directory — this is your main Morrowind folder again, where Morrowind.exe is. You will also be asked for a “Mod Installers” directory, and this is where you choose the “Morrowind Mods” folder you made. Don’t worry about Mlox.
- Continue through the Wrye Mash installer and click “Finish.” Wrye Mash will now launch, and you should see a notification that is quite excited to see you:
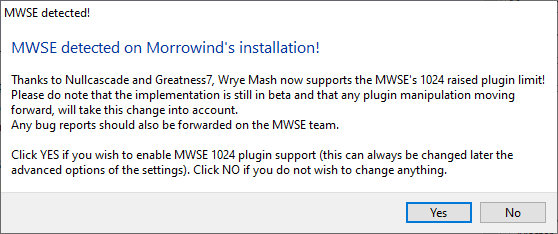
Click the “Yes” button if you see this. If it doesn’t appear, or you clicked “No” by accident, we’ll set this option ourselves in a moment.
Okay, that’s Wrye Mash installed and ready! Now, the instructions above are assuming you aren’t using MO2, but if you are, you’ll need to exit it, make sure it’s registered within MO2 as described in my MO2 tutorial, and then relaunch it from MO2. You will never need to launch it from outside MO2 again.
Now take a look at the Wrye Mash main screen.
At the bottom left of the main Wrye Mash window, you’ll see a series of icons including one that looks like a gear. Clicking the gear will open the Settings Window. On this window, click the Paths tab at the top. At the bottom of this tab, you’ll see an indication of whether Wrye Mash has detected TES3cmd in your Data Files. If it already says “Detected!” you’re good. If not, click the “Re-Check” button to tell it to look again. Below is a screenshot with all the relevant parts of Wrye Mash outlined in red…
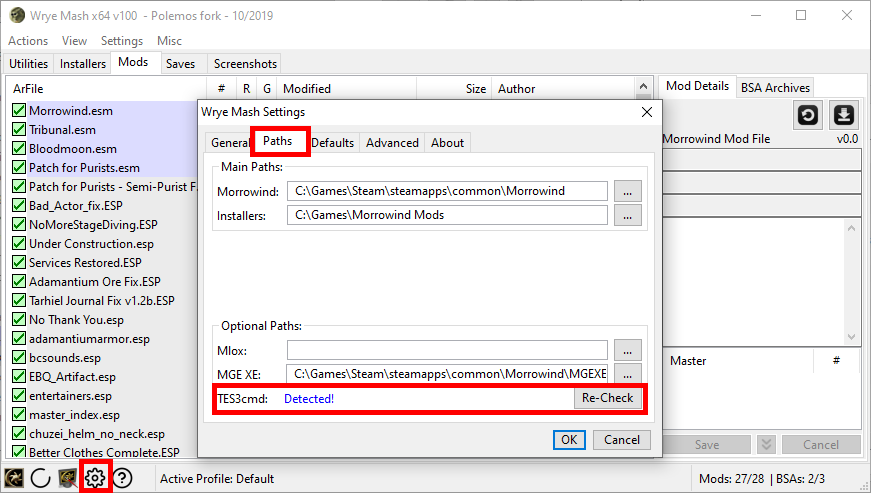
…as well as some spoilers about other mods I’ve installed while making this guide. Oh well!
Once TES3cmd is detected by Wrye Mash, you’re ready to actually clean mods. But before you do that, let’s check one more setting. Click the “Advanced” tab, and make sure the option “Add support for up to 1024 plugins (beta), default is 256, MWSE required.” is checked, as seen below:
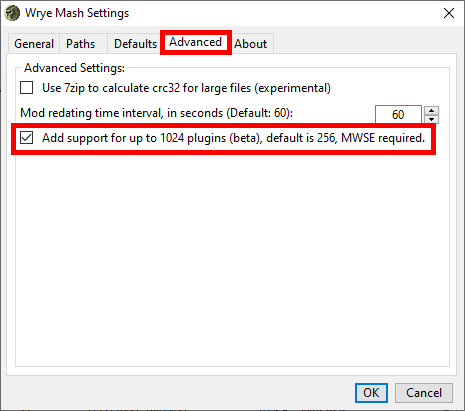
Once that’s done, you can click “OK” on the settings window.
Now we are finished setting up Wrye Mash and making sure all its options are correct, so next I’m going to show you how to clean mods.
The Mod-Cleaning Process
If you already installed TES3cmd and Wrye Mash while following my MO2 tutorial, and zoned out when the above “Are You Using MO2? I Have Good News” section told you you’d already done part of this, here is where you need to start paying attention again.
By the way, don’t do any of the below steps until you’ve read the rest of this page — just follow along for the moment. You’ll see why.
To clean a mod, right-click it in Wrye Mash and select “Clean with TES3cmd” from the dropdown menu that appears. Below, I am attempting to clean Patch for Purists – Semi-Purist Fixes.ESP (it doesn’t need cleaning, but I wanted to show you what happens in that case too, and to demonstrate with a mod you may have installed already).

A window will appear with a progress bar to show you the status of the cleaning. The “Output” tab will display anything that was removed from the mod, while the “Errors” will display any errors TES3cmd encountered while attempting to clean it. You can see this below. As I said, Patch for Purists – Semi-Purist Fixes.ESP does not need to be cleaned, so it was not modified by TES3cmd.
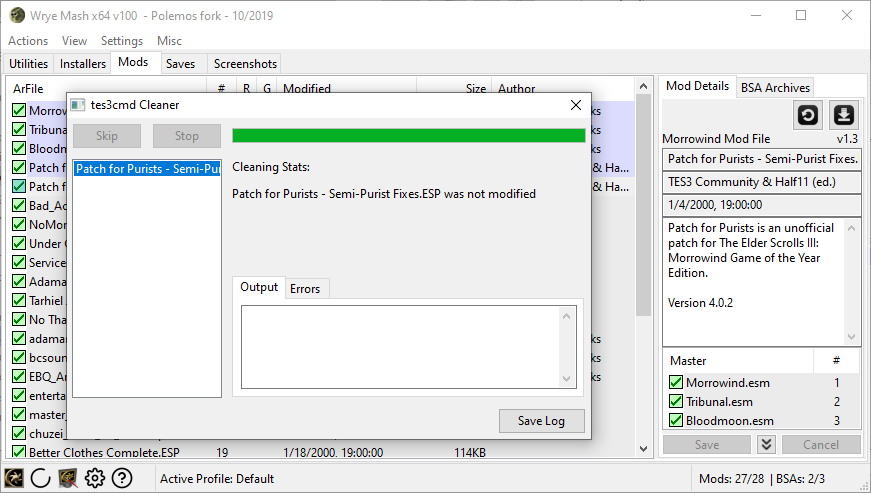
The fact that Patch for Purists – Semi-Purist Fixes.ESP was not modified means it’s a nice, clean plugin free of phony records and Evil GMSTs. Yay!
If TES3cmd does find things to clean out, it will modify the original plugin file whether the plugin is in Data Files or MO2’s virtual directory. The plus side of this is that you don’t have to hunt down the clean file and move it where it needs to go. TES3cmd will also create a backup of the file which it stores somewhere else. The official documentation says the default backup save location is Data Files/tes3cmd/backups, but when I ran TES3cmd through Wrye Mash from MO2, the folder was called tes3cmdbck. I’m not sure if this is simply the new folder name coming from the newest TES3cmd version, but it should be easy to find either way.
When using MO2 for this process, this backup folder is created in MO2’s Overwrite folder (along with a tes3cmd/Logs folder for the logs of what TES3cmd did while cleaning mods) and MO2 will complain about it being there. I’m going to explain this better in the unfinished part of the MO2 tutorial, but for now you can just ignore it. If you want to take care of it now before I’ve written the better instructions, you can move those folders out of Overwrite within MO2 and make them into a fake “mod” (just don’t activate it), close the MO2 program and just drag the folders out of the MO2 directory and put them somewhere else to keep them, or simply delete them if you don’t feel the need to keep those backups or logs (say, if you still have the downloaded archive and can just reinstall the mod if need be).
So it really is that easy… except for one more thing.
There are some mods you shouldn’t clean.
When NOT to Clean a Mod
Okay, I know — I just told you how to clean mods and did my best to scare you with information about redundant game information and Evil GMSTs, and I alluded to how TES3cmd removes what’s not supposed to be there and leaves everything that is. And now I’m telling you there are some mods you shouldn’t clean?
Yup, it’s true. Some mods have what we would normally consider “dirty edits” in them on purpose. Sometimes these are necessary for making complex mods work, and other times they’re there specifically to revert something from another file. TES3cmd is a wonderful tool, but it can’t read mod authors’ minds — if something looks dirty, it’s going to clean it. It won’t know the difference if this was included deliberately.
The main Patch for Purists mod file, Patch for Purists.esm, is a perfect example of a mod you should not clean. Let’s take a look at what happens if you do:
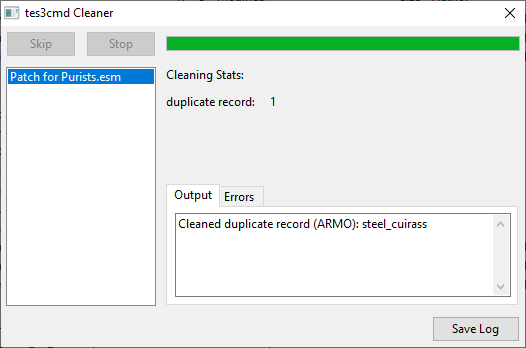
So what’s wrong with this? It found a duplicate record, didn’t it? It found something referring to the steel cuirass that was the same as in one of the master files, Morrowind.esm, Tribunal.esm, or Bloodmoon.esm. So why am I saying it shouldn’t be cleaned?
Well, if you check the Patch for Purists Version History text file that comes with the mod, it includes this information:
BUG Tribunal introduces a female appearance for Steel Cuirass, but Bloodmoon overwrites it back to match vanilla Morrowind.
FIX Corrected.
So basically, this “duplicate record” shown in the box above is the steel cuirass from Tribunal, deliberately placed into PfP to overwrite the change from Bloodmoon. Since it comes directly from Tribunal.esm and is unchanged in any other way, TES3cmd thought it was a useless, “dirty” record and deleted it. However, this would restore the incorrect Bloodmoon version to the game, therefore undoing the fix that Patch for Purists implemented.
That’s why you don’t want to clean it!
So how do you know which mods NOT to clean? Thankfully, they’re pretty rare. Big patch mods like PfP should generally be ignored for reasons like the above, as should any mod that specifically says its purpose is to restore something to the records used in the original game or Tribunal. Best of all, almost all mods that should NOT be cleaned will say so right on their download page. Mod authors know that experienced Morrowind players clean mods, so they’re sure to point it out when you shouldn’t do it.
You should also never clean any of the games three master files: Morrowind.esm, Tribunal.esm, or Bloodmoon.esm. Some mods and programs rely on these files remaining in their original state, so cleaning them can break things very badly.
If you ever have any doubts about a mod — before cleaning, or afterward if you notice a lot of stuff that seems like maybe it shouldn’t have been deleted — read the mod’s documentation including its page on the Nexus or whichever site, check its comment threads, and restore your backup (or reinstall the mod) if you find you’ve cleaned something you shouldn’t have. This is also why it’s rarely a good idea to clean your entire mod list at the same time, which TES3cmd does allow you to do. You can shift-click mods in Wrye Mash to select a block of them or control-click to pick them out one by one. Don’t do it unless you’re absolutely sure that every mod you select is okay to clean.
As we go through this guide, I’ll also point out any mods that DO need cleaning and warn you about any that DEFINITELY should not be cleaned. If I don’t say anything about it one way or the other, assume it doesn’t need cleaning and move on. That’s why I’m mentioning this now: if we run across a mod that needs to be cleaned, I can simply refer you back to this entry to refresh you on how it’s done rather than needing to cram all this information in elsewhere.
So what’s next? A bit more technical stuff that will also save your bacon in the future: Fixing Mod Conflicts with Merged Patches (it’s still mostly automated, don’t worry).
