
Last updated May 15, 2023.
The following is a tutorial for installing and setting up Mod Organizer 2 (MO2) for use with Morrowind. These instructions probably also work fine with other games, but I’ve currently only tested it with Morrowind (and the mods and tools I have you install here are Morrowind-specific). It works equally well with Steam and GOG installations but I have not tested with discs. When I find my discs, I’ll test an installation with them just in case.
This tutorial is not intended for use with OpenMW but you will probably still find some of the information useful.
Where Does This Tutorial Fit in With the (Re)installing Morrowind 2023 Modding Guide (or Other Guides)?
I wrote this tutorial as a supplement to my (Re)installing Morrowind guide because the guide itself is not written to require MO2. In the introductory section of the first guide entry, (Re)installing Morrowind: Basic Installation, I discuss the pros and cons of MO2 versus a manual installation and direct you to this tutorial if you choose to use MO2. If you arrived here from that part of the guide, you already know this. However, it’s important for you to understand that this tutorial is a supplement, not a complete replacement, for the instructions in the rest of the guide.
Some of the (Re)installing Morrowind guide entries cover the utilities, patches, and mods that we will install during this tutorial. However, the details about these components are discussed on the relevant guide pages, and this tutorial is limited to installation and brief setup instructions only. During the course of this tutorial I will occasionally direct you to the guide entry that covers the mod or utility in question in order for you to read more information about the topic before coming back here to continue with your MO2 Morrowind setup.
Once you’re finished with the instructions in this tutorial, I will also direct you to the proper starting point in the guide as a whole so you can continue with the (Re)installing Morrowind modding guide without being confused as to what you have already done. During the course of the main guide, I will sometimes also refer to things you’ve installed during this tutorial and point them out for clarity. This is part of my mission of supporting both MO2 and manual modding setups.
I recommend you keep this tutorial open in a browser tab as you follow it, even though I do instruct you to refer to entries in the main modding guide — for convenience, they will all open in a new tab when linked from this page.
What’s Covered in This Tutorial?
In this tutorial, we will do the following (although not necessarily in this order):
- Make sure our Morrowind installation is ready for use with Mod Organizer 2.
- Download, install, and perform initial configuration for MO2.
- Install two important Morrowind mods.
- These are the first two mods from my (Re)installing Morrowind guide and are foundational for most other modern Morrowind modding guides, so you will not go astray by installing them even if you intend to use a different modding guide. You can also easily remove them afterward.
- Install the Morrowind Code Patch (MCP).
- Install Morrowind Graphics Extender XE (MGE XE).
- Learn how to examine, activate, or remove mods in MO2.
- Learn how to deal with things being placed in MO2’s Overwrite folder.
- Install crucial Morrowind utilities such as Wrye Mash and TES3Merge and connect them for use with MO2.
- If you’re going to run a remotely complex modded Morrowind, you will need to have these tools installed, even if you only end up using them for a few small tasks. So, this page should get you fully set up for using MO2 with Morrowind and ready to do anything else necessary (such as cleaning mods, etc.), although specific instructions for using the tools will be in their own dedicated parts of my (Re)installing Morrowind guide. Those guide entries will be linked here as they are completed. You do not currently have to understand everything about these utilities to get them installed and ready for later use; I’ll provide that information in the relevant guide entries, but installing them now will save time later.
As part of this tutorial I will suggest following MO2’s built-in tutorial that comes up the first time you run the program, but I also expand on that information here, since the built-in tutorial doesn’t fully cover everything about installing and running a mod. As I mentioned above, during this tutorial you will install the first two mods from (Re)installing Morrowind — this is because by doing so, I can show you how these mods look in MO2 and provide more information that will be important for using any mod.
This tutorial is not going to cover every single thing about MO2, partially because I’d have to put several more mods at the end of it to show you everything you need to do. But! I will add more to it when additional main guide entries are finished, because by then we’ll have more mods installed and I can again refer you back here for MO2-specific instructions.
Final note before we begin: the number of screenshots on this page will increase when I reinstall MO2, but the instructions are actually pretty straightforward so screenshots aren’t incredibly necessary for every step. I’ll still add them when possible to make it as clear as it can be.
Step 1: Your Morrowind Installation
You need a completely clean, fresh installation of Morrowind, outside of C:\Program Files. For more installation information, refer to (Re)installing Morrowind: Basic Installation and then return to this tutorial.
In short, your Morrowind installation must be:
- On a 64-bit operating system.
- Preferably from Steam or GOG (these are the only two digital downloads of Morrowind that are completely moddable by crucial tools like the Morrowind Code Patch; DRM from other vendors prevents it from working). Discs are probably fine too, but I haven’t tested them with MO2.
- In a location that is not within C:\Program Files, to prevent numerous potential issues. If your Steam installation is inside Program Files, follow Steam’s instructions for changing its location; I use C:\Games\Steam. Morrowind isn’t the only game that hates being in Program Files, so it may benefit you to move your entire installation rather than just defining a different path for Morrowind. If you’re trying to move your Steam library to a new place on the same drive, Steam is sometimes difficult about letting you do this — this Steam Library Setup Tool may help.
- A brand-new Morrowind installation (no mods already in Data Files). Any mods already in Data Files will not be properly manageable with MO2 and will mess with your modding setup. The GOG version comes with the official plugins from Bethesda which you will need to delete (you can re-add better versions later). See the relevant section of Basic Installation for complete information on this.
You must also:
- Turn off the Steam Overlay for Morrowind if you are using the Steam version. Instructions for this can be found at Basic Installation (but then return to this tutorial).
- Run Morrowind at least once. This is partially because some of the next tools require Morrowind.exe to have been opened before and partially to ensure your copy of Morrowind is correctly patched to version number 1.6.1820 (again, refer to Basic Installation if your version number is wrong or you don’t see a number at all, then come back to this tutorial once you have it sorted out).
Step 2: Other Requirements
You will also need to do the following:
- Create an account on Nexus Mods. A free account is fine.
- Create a folder on your computer (again, outside of Program Files) called “Morrowind Mods” or “Morrowind Tools” or something like that. MO2 requires such a folder, but it isn’t the only Morrowind modding tool we’re using the folder for, so that’s why I suggest these names. Throughout this tutorial I will use the name “Morrowind Mods” for this folder, so keep that in mind regardless of what you choose to call it.
- Exclude every .exe (including Morrowind.exe itself) from your antivirus and firewall shields, or exclude the entire Morrowind folder and Morrowind Mods folder from your antivirus if it offers the option to exclude whole folders. Nothing here is unsafe to use. If you don’t seem to have any problems, it’s safe to skip this until you do encounter an issue — if your antivirus or firewall does block something, you can simply choose to allow it through when it happens.
Step 3: Downloading Mod Organizer 2
Visit the Nexus Mods page for Mod Organizer 2 here. Don’t be concerned that it’s listed as a Skyrim Special Edition mod; this is the one you want.
- I recommend you read the entire MO2 Nexus page anyway, but please at least read far enough down to learn about the prerequisites you need to install on your computer; these include the newest Visual C++ 2019 redistributables and .NET Framework 4.8. Links to those are provided on the MO2 page. (There is a chance you already have them installed; they seem to come with some Windows updates. You can try installing and running MO2 without them to see if you already have them and just come back if it doesn’t work. Your computer may also prompt you with the option to download those prerequisites automatically.)
- Once you have the prerequisites and/or you’re ready to download MO2, click the “FILES” tab on the MO2 Nexus page and find “Mod Organizer 2” under “MAIN FILES.”
- Click the button labeled “MANUAL DOWNLOAD.”
This will download the .exe installer for MO2 onto your computer. It will be called “Mod Organizer 2-[some numbers].exe”, like so:
![]()
Step 4: Installing Mod Organizer 2
Now let’s get to actually installing MO2:
- Make sure you have exited out of Morrowind and its default launcher.
- Run the Mod Organizer installer .exe. You will be asked where to install it; set the installation file path to Morrowind Mods\MO2.
- You’ll have the option to create a desktop shortcut; this is a good idea because you will actually need to open Mod Organizer 2 to play Morrowind with it, but you can also create one later by finding your MO2 installation folder and creating the shortcut then. Just remember that this is how you will need to launch Morrowind.
- Click “Finish” after installing, and then Launch Mod Organizer.
- What you will then see is a notification about “Creating a New Instance.” This screen provides a brief explanation of what an “instance” is — basically, every game you use MO2 for needs a separate instance to manage mods for that game. Click “Next.”
- Choose to “Create a portable instance.”
- Creating a portable instance is the preferred method because it installs an instance of MO2 specifically for Morrowind, into the Morrowind Mods folder (in this case), rather than to your computer user account’s AppData folder (which is what a “global instance” does). This keeps everything much more easily organized, especially if you start using MO2 for multiple games.
- Don’t be alarmed that it says “There can only be one portable instance per installation of Mod Organizer.” This does NOT mean you will not be able to use MO2 with other games in the future; it simply means you’ll need to install MO2 again (following these same instructions) for any other games you use it for. Having multiple installations/portable instances of MO2 on your computer will not cause any problems and each instance will be properly kept separate for each game you use MO2 with.
- Portable instances also make it easier to move your MO2 setup to a new computer, with all your mods intact.
- Additionally, most modding guides recommend portable instances, and if you use mod packaging tools like Wabbajack (which download a complete mod list for you) they rely on portable instances as well. I have yet to find a compelling reason to ever use a global instance for anything.
- You will then see a window to “Select the game to manage.” Click Morrowind if it’s already there. If Morrowind isn’t already visible here, click “Browse” to navigate to it.
- Selecting Morrowind will bring you to the next screen in which MO2 asks you to “Select a folder where the data should be stored.” It should already have your “Morrowind Mods” folder selected (this is the default folder), but if not, browse to it to select it.
- You will then have the option to “Link Mod Organizer with your Nexus account.” Open your web browser and log into the Nexus, then click the “Connect to Nexus” button in the Mod Organizer 2 window. Switch to your Nexus account in your browser window to authorize the connection.
- If this does not work, click the “Enter API Key Manually” button in the MO2 window, and visit this page on the Nexus. Scroll down to Mod Organizer 2 and click the button labeled “REQUEST AN API KEY.” Copy the key that generates (it will look like a bunch of gibberish text) and paste that into the field in the MO2 window.
- Once your MO2 installation is linked with the Nexus, click “Next,” check the information in the window to confirm that it’s correct, and then click “Finish.”
- You may then see a window that mentions you are running Mod Organizer for the first time and asks if you want to run through a tutorial. I recommend you click “Yes” because it’s very helpful for new users, but you can skip it if you want to.
- You will have to complete the tasks the tutorial gives you before you can continue through it. If it seems like it won’t advance, look for a place it’s telling you to click that you may not have noticed.
- During this tutorial you will be asked to install at least one mod. My recommendation is that you install Playable Uncompressed Vanilla and Expansion Textures because it’s the first mod you’d install if you’re following my (Re)installing Morrowind modding guide. Visit that link in your web browser, click the “FILES” tab, and find “MAIN FILES” at the top. Download “Playable Uncompressed Vanilla Textures” from “MAIN FILES” by clicking “MOD MANAGER DOWNLOAD.”
- If you’re using a free Nexus account, you can only choose “SLOW DOWNLOAD” from the screen that appears, but in my experience it isn’t even that slow (and I’m just on Comcast, nothing special).
- A small window will likely appear in front of MO2, labeled “Register?” and saying “Mod Organizer is not set up to handle nxm links. Associate it with nxm links?” Click “Yes” and the mod will start downloading through MO2. If you do not see this window, it may be behind the main MO2 window or minimized to the taskbar; mouse over MO2 in your taskbar and you should be able to click it to bring it into view. The mod will not start to download until you click “Yes” in this window.
- Your web browser will also likely have a small window pop up to ask you whether to allow “NXM Link Proxy” to be opened by https://www.nexusmods.com. Check the box to always allow it to do so, and then click to open it. The wording of this message will probably vary depending on your browser, but it’s basically just asking you whether to allow MO2’s Nexus downloading feature to handle these downloads, so say yes.
- You can watch a progress bar of the mod downloading in the “Downloads” tab in the right-hand pane of MO2. Once it’s finished, double-click the mod in the “Downloads” tab to install it. From here, you can proceed with MO2’s built-in tutorial.
- The built-in tutorial will soon show you the “Plugins” tab in the right-hand pane along with an explanation that mods can have one or more .esp files or none at all. Just to clarify, the mod we just installed does not have an .esp file, so don’t worry that you don’t see one relating to it in this tab.
- For more information about Playable Uncompressed Vanilla and Expansion Textures and why we are using it, refer to (Re)installing Morrowind: Patch for Purists and Load Order and read the “Improving Fidelity of the Vanilla Graphics” section (but remember you already installed it just now and the installation instructions in that guide entry are no longer important to you), and then return to this tutorial.
- Once the built-in tutorial has ended, check the “Plugins” tab and make sure the following files are present in this order (these are the master files for Morrowind and its expansions). If they are not in the right order, you can drag and drop them into the right place:
- Morrowind.esm
- Tribunal.esm
- Bloodmoon.esm
- In the left-hand panel, you’ll see “DLC: Tribunal” and “DLC: Bloodmoon,” but make sure they are in the same order with Tribunal first. Playable Uncompressed Vanilla Textures Replacer should be after Bloodmoon, and with a check mark to show that it is active.
- To make sure everything works, start Morrowind by clicking the “Run” button in the upper right side of MO2. From now on, you will need to run Morrowind this way, otherwise the mods you’ve installed through MO2 will not be present in your game. I recommend making a desktop shortcut for this instance of MO2 (if you haven’t already) and renaming the shortcut to “Morrowind,” “Morrowind MO2,” or similar. You can even change its icon to the Morrowind icon if you desire. Scroll down to “How to Change Icon Pictures” in these Windows directions if you don’t know how. You can navigate to your Morrowind folder to get the icon from there.
Now that MO2 is installed and working, let’s look at installing some other important tools for use with it.
Step 5: Setting Up Additional Tools in Mod Organizer 2
In this section, we’ll look at some crucial programs for use with Morrowind and how to add them to MO2. In order for these programs to work with your MO2 installation of Morrowind, they need to be registered in MO2. Fortunately this is very easy to do.
First, exit out of MO2.
Requirement: the Morrowind Code Patch
Before you do anything else, you will need the Morrowind Code Patch (MCP). The MCP is a requirement for several later tools and mods to work.
While you must run Morrowind and most of the rest of the tools through MO2, the MCP is an exception because you will not be running it through MO2. Visit Morrowind Code Patch (and More) to learn about the MCP and make sure you install its beta update as well, as described on that page. When you run the MCP, just open the .exe from within your Morrowind folder — MO2 doesn’t need to be involved for that part.
Rather than only skimming it for installation instructions, I strongly recommend you read through Morrowind Code Patch (and More) to learn what the patch is doing, which options you need to have selected, and my perspectives on some of the other options regarding how they will affect your game.
When you are finished making your choices and applying the patch, return to this tutorial.
Now let’s update your Morrowind.ini with some new settings to take advantage of some of the MCP’s changes, if you did not already do so while following the instructions on Morrowind Code Patch (and More) (I’m basically repeating them here for convenience).
- Locate Morrowind.ini in your Morrowind folder.
- Make a copy of it as a backup and save it somewhere.
- Open MO2 again.
- Click the Tools icon on MO2 (it looks like puzzle pieces) and select the INI Editor from the dropdown menu that appears. You can see this below, with the button highlighted and the INI Editor open:
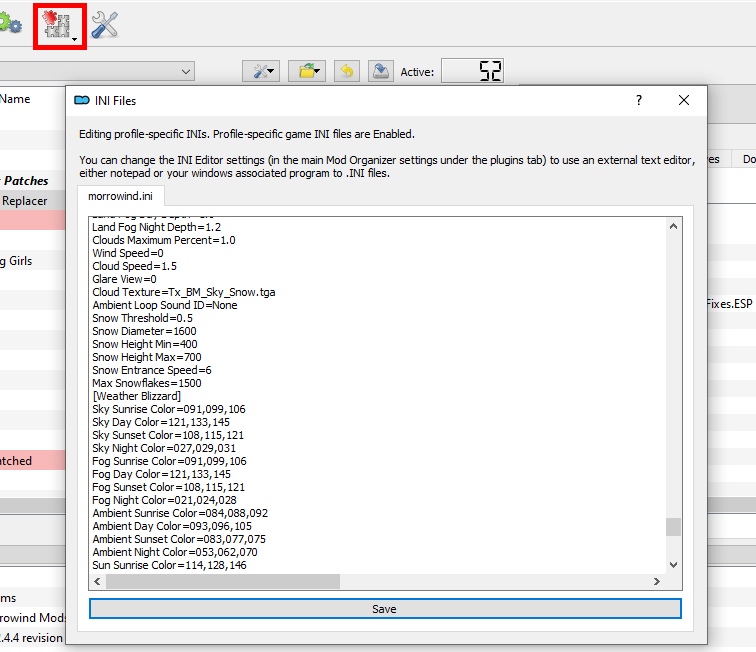 (Keep in mind that the INI Editor is selectable from a dropdown menu that appears when you click the Tools icon. The dropdown menu is not visible in the screenshot above, but it’s a tiny menu and finding the INI Editor will not be hard.)
 - Now, inside the INI Editor, find the heading [Weather Rain] and change the following entries to match what you see below:
- Rain Diameter=1200
- Max Raindrops=1500
- Find [Weather Thunderstorm] and change these entries to match these numbers:
- Rain Diameter=1200
- Max Raindrops=3000
- Find [Weather Snow] and change these entries to these numbers:
- Snow Diameter=1600
- Max Snowflakes=1500
- Click the “Save” button at the bottom. MO2 doesn’t give you any feedback to let you know that your changes were saved, but it does save the changes.
- Close the INI Editor.
- Make another backup copy of Morrowind.ini, without overwriting your previous backup. It’s up to you how you organize and store these backups, as long as you can tell them apart.
- One way would be to create a folder called “Morrowind INI backups” inside your Morrowind Mods folder. Inside “Morrowind INI backups” create a folder called “Vanilla INI” and place your first backup in there. Back in the “Morrowind INI backups” folder, create another folder and name it “MCP Settings INI” and place your new backup in there. Do this whenever you back up your Morrowind.ini always using a descriptive folder name. If you hate having so many folders, you can rename the .ini files themselves, but remember you will need to rename them back to Morrowind.ini if you decide to restore the backups.
- As a last resort, if you need a fresh copy of Morrowind.ini, you can download it from here (use “MANUAL DOWNLOAD”). I call this a “last resort” because this is just the untouched Morrowind.ini and only you can back up copies that include edits you make.
All right, the Morrowind Code Patch is done! Now it’s time for…
Morrowind Graphics Extender XE (MGE XE)
MGE XE produces proper widescreen and improves visuals, and is a staple of a non-OpenMW Morrowind installation.
- Close MO2.
- Visit MGE XE on the Nexus and download “MGE XE Installer” using Manual Download.
- The installer will be inside a .7z archive file. Just extract this right into your downloads folder, your desktop, or anywhere.
- Run the installer to install it in your main Morrowind folder (where Morrowind.exe is), not Data Files or Morrowind Mods. Install MWSE (Morrowind Script Extender) as well as all required libraries offered by the installer.
- Your computer may prompt you that the software you’re installing needs certain components to run; accept the prompt to download and install whatever it offers you. These are coming right from Microsoft and they are fine.
- When MGE XE is finished installing, you’ll see a “Completing MGE XE [version number] Setup” window asking whether you want to run MGE XE Config and open the Readme. Don’t bother opening MGE XE Config yet, but you can open the readme if you wish to.
- The MGE XE installer will also install a mod into Morrowind\Data Files called “XE Sky Variations.esp” which “will randomize the sky colour and sunrise/sunset every day. It requires high quality sky scattering enabled, and MWSE installed” as per its description on MGE XE’s Nexus page. This guide does not use this mod, so you can delete it from Morrowind\Data Files.
- Run MWSE-Update.exe (which is inside your Morrowind folder) to make sure your copy of MGE XE has the most up-to-date version of MWSE.
- Download the 4GB Patch, extract it from the archive it comes in, and run it. Apply it to MGEXEgui.exe which you will find in the Morrowind folder. This patches it for faster speed with 64-bit systems. (We used to use this on Morrowind.exe too, but the MCP includes that feature now too and already handled that.)
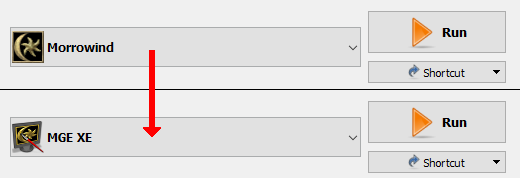
- Open MO2 again. Click the big dropdown menu on the right side where Morrowind is, and MGE XE should be visible there too. Select MGE XE and click “Run.”
Now that MGE XE is open in MO2, let’s set it up. This is only the basic setup for getting started with MGE XE because for the moment, this is all you need.
Please note that MGE XE has its own “Instructions” tab within the program itself, but those instructions also lead you through shader setup which is something I like to do later after we have other graphical mods installed (the shaders will affect the appearance of the graphics, so I leave them till later so I can better judge the game’s looks and performance before applying extra processing to it). So you can ignore that tab for now because I’m going to cover it when we’re ready in the main guide.
- Visit Morrowind Graphics Extender (and More) and read the section under the heading “MGE XE Initial Setup.” Follow the instructions in that section and then return to this tutorial.
- When you are finished setting up MGE XE, close it and switch your MO2 dropdown menu back to Morrowind. We have to do a couple of things in the game now, so read this step along with steps 3 and 4 below so you’ll know what you need to do in-game (alt-tabbing doesn’t always cooperate). Make a note of the instructions on Morrowind Graphics Extender (and More) under the heading “Help! My UI is Really Tiny and I Can’t Read Text!” and run Morrowind through MO2. Get in-game with a test character and adjust your UI size according to those instructions. Remember to save the settings.
- Get through the character generation and run around Seyda Neen to see if your MGE XE settings seem okay. If you’re getting lag, reduce your Draw distance in the in-game MGE XE settings menu until you achieve an acceptable framerate. If you’re playing in 4k or another high resolution, you can try reducing this too. There are other ways to fine-tune this, but these can be enough for now. (High detail actor shadows are an FPS hit and work poorly anyway, so that’s another thing to turn off. They are off by default because they are lousy.)
- Save your test character if desired (although you’ll need to start over once your mods are all installed, it doesn’t hurt to have a test character or two). Exit Morrowind and MO2.
The next sections of this tutorial explain how to install tools that are listed in later sections of the guide. There is no harm whatsoever in installing these now and it will simply save time for you later. Other instructions on the various guide pages will go over how to actually use these tools; the following will just help you install them so you can be ready. Once we are done installing these tools, this tutorial page will have a link back to the part of the guide you need to start from after having done all this, where we start installing more actual mods.
Wrye Mash and TES3cmd
Wrye Mash is a powerful tool to organize and repair mods and savegames, and is considered a core part of a modded Morrowind installation. It also has some functions similar to MO2, but can be used alongside/within MO2 to access its other useful features while still relying on MO2 for mod setup and load order management.
TES3cmd is a command-line tool with several uses, but our primary interest is its ability to clean “dirty” mods (which helps prevent certain types of errors). We’re downloading it in conjunction with Wrye Mash because Mash allows you to access TES3cmd’s relevant features from within its own menus instead of needing to run TES3cmd via command line.
Let’s install these crucial utilities now.
- Download tes3cmd.exe from here. You may need to expand the “Assets” section at the bottom to see the .exe available for download.
- Note: I don’t think it matters whether you install TES3cmd or Wrye Mash first, this is just how I do it.
- Drop tes3cmd.exe right into Morrowind\Data Files. Even when using MO2, this is where TES3cmd needs to be.
- Visit Wrye Mash on the Nexus. Open the “FILES” tab, look under “MAIN FILES,” and use “MANUAL DOWNLOAD” to download the one labeled “Wrye Mash 2019 x64 – Installer.” The downloaded file will be called “Wrye Mash 2019×64 – Installer-[some numbers].exe” like below, unless the installer version receives an update. Don’t worry if it’s a little different; it’s just that if Wrye Mash has updated, you won’t need to install the update yourself like we’re going to do in a few minutes.

- Run the Wrye Mash installer you just downloaded and install Wrye Mash into your Morrowind folder (where Morrowind.exe is). You can choose to create a desktop shortcut but you’re likely to only need to open it once, as you’ll be opening Wrye Mash from inside MO2 once this process is complete.
- Back on the Wrye Mash Nexus page, look under “UPDATE FILES” and use “MANUAL DOWNLOAD” to download “Wrye Mash 2021 – x64 – beta6 – manual installation archive.”
- Extract the archive you just downloaded and drop all its contents into the Morrowind folder (again, where Morrowind.exe is). Allow all overwrites.
- Run Wrye Mash, either from your desktop shortcut, or by running mash64.exe from inside Morrowind\Mopy.
- An installation wizard will open that is easy to follow. When asked for your Morrowind directory, choose your main Morrowind folder (where Morrowind.exe is… you get the idea). When asked for a “Mod Installers” directory, choose your Morrowind Mods folder (where you installed MO2 to). You can safely ignore the request for an Mlox directory.
- Proceed through the rest of the installer and click “Finish” to launch Wrye Mash. You are running it outside of MO2 for the moment, but this is just the one time needed for initial setup. When it launches, you should see the excited notification shown below:
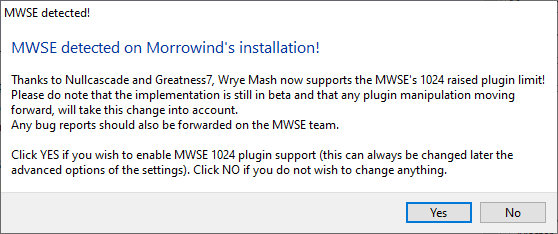
Click “Yes.” If you accidentally clicked “No,” we’ll take care of it in a moment. - You will now be on the main Wrye Mash screen. Click the icon along the bottom left that looks like a gear; this is the Settings button. First, click the “Paths” tab to check that all your file paths are correct, and that your installation of TES3cmd is detected. The relevant areas to click or check are highlighted in the below image.
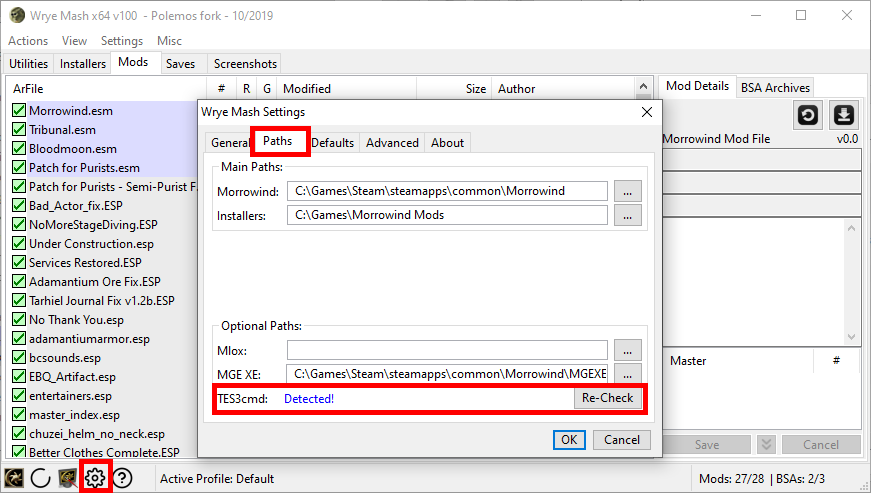
- Next, click the “Advanced” tab. If you clicked “Yes” on the “MWSE detected!” announcement, the relevant option here will already be checked. Confirm that “Add support for up to 1024 plugins (beta), default is 256, MWSE required.” is checked, as shown below.
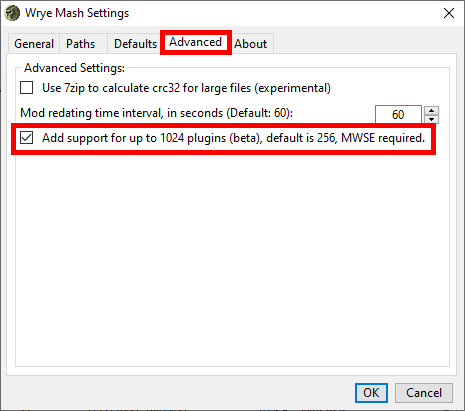
If it’s checked, click “OK.” - Close Wrye Mash.
You will now have to register Wrye Mash inside of MO2, otherwise MO2 will not know you have Wrye Mash and vice versa. The goal of this installation is to allow you to use MO2 and all Morrowind-related tools directly through it, and everything needs to run through MO2 or else the mods you have installed will not be seen by the other tools such as Wrye Mash.
We will now register Wrye Mash in MO2.
Open MO2 and click the Executables button at the top of the MO2 window. It looks like gears. Then, in the “Modify Executables” window that opens, click the “Add an executable” button, which is labeled with a small plus sign. From the menu that opens, select “Add from file…” as seen below (with relevant areas highlighted, and mod spoilers AGAIN):
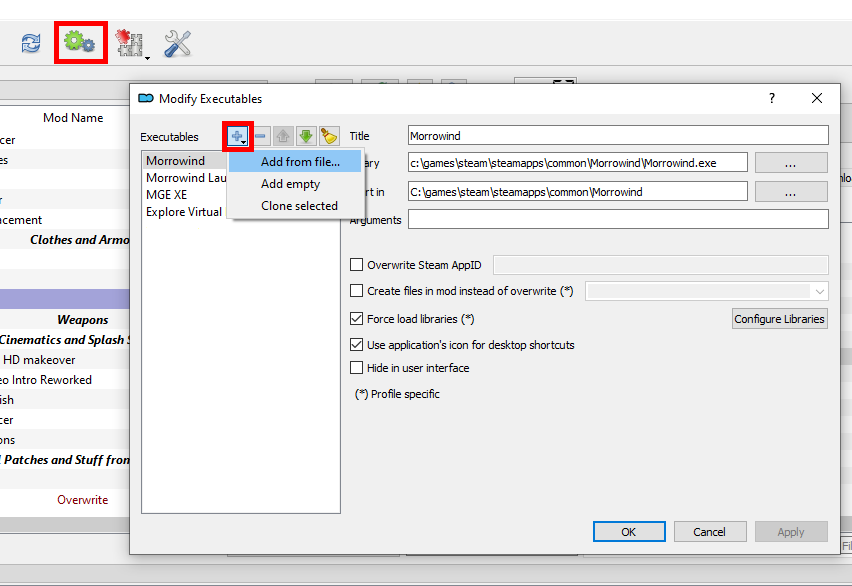
A typical Windows navigation window will appear. Navigate to Morrowind\Mopy and select mash64.exe, and click “Open.”
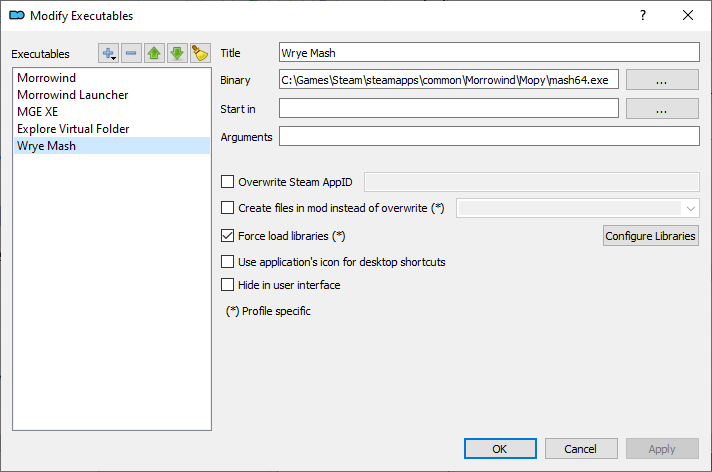
You’re now back at the “Modify Executables” window. You’ll be able to see Wrye Mash added to the list of executables inside MO2, as shown below. These are the things you can open from MO2’s big dropdown menu where you run Morrowind from. Entering “Wrye Mash” (no quotes) into the “Title” field will name it properly, otherwise it will show up in the dropdown as mash64.exe (which will still work but potentially annoy you). Once you’ve named it, click “Apply” but if you forget to name it you can open this menu later and apply the name then. (Also, don’t worry about the “Force load libraries” checkbox — some versions of MO2 have it checked by default, but it doesn’t do anything if it’s not applicable to the executable you’re configuring. In the vast majority of cases you can ignore it; there are only a few executables that specifically require it to be checked or unchecked, and if I describe any of those cases anywhere on this website I’ll tell you then).
You will follow these same steps for every .exe tool we install, except tes3cmd.exe. There is no need to run TES3cmd outside of Wrye Mash, which you’ll be opening from inside MO2… so MO2 doesn’t need to have tes3cmd.exe registered in it.
Now that Wrye Mash is registered in MO2, it can be accessed from the MO2 dropdown menu just like Morrowind and MGE XE (which is able to register itself automatically, hence why you didn’t need to register it to run it):

To run Wrye Mash, you will select it from this menu from now on.
If you weren’t able to successfully get Wrye Mash registered, I’m not completely sure of the best place to troubleshoot — start by modifying the Wrye Mash executable again in the above screen and clicking the “…” button next to the “Start in” field, and select your main Morrowind folder from the window that appears. This will make sure Wrye Mash knows where your Morrowind folder is, although you usually don’t have to define this parameter for it. If that doesn’t work, try the MO2 Nexus page and the Wrye Mash Nexus page. If I find a good solution or troubleshooting method I’ll add it here, but since I didn’t have a problem, I won’t have any personal experience with any fixes.
TES3View
TES3View is a utility that allows you to view the changes made by mods that use an .esp or .esm file. If you are familiar with modding Skyrim or other Bethesda games, this is basically the same program as TES5Edit or xEdit, however it can only view Morrowind plugins, not edit them as with the other games. Support for Morrowind is still being worked on so it’s possible we will see more of those features come to TES3View (potentially turning it into a fully-fledged TES3Edit). For now, TES3View’s primary purpose is to see the changes plugins make and, most importantly, to help diagnose conflicts between them.
- Exit MO2.
- Visit TES5Edit Releases on GitHub and find “xEdit 4.1.4c EXTREMELY EXPERIMENTAL.”
- Click on xEdit.4.1.4c.EXTREMELY.EXPERIMENTAL.7z to download it. You may need to click the “Assets” section to expand it and reveal the downloadable files.
- Find your Morrowind Mods folder and create a folder inside it called TES3View.
- Unzip the archive you just downloaded into a separate folder. You’ll see a bunch of stuff:
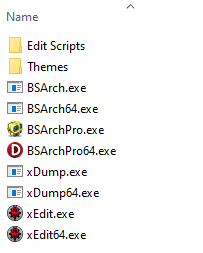
- Move only the following files/folders into your new TES3View folder:
- Edit Scripts
- Themes
- xEdit.exe
- Your TES3View folder should now have these contents:
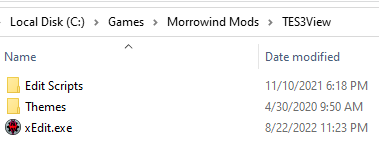
The filedates aren’t important; I just want you to confirm that this is your TES3View folder inside Morrowind Mods, not the archive. Also, you do not want xEdit64.exe regardless of your operating system; xEdit.exe is the one you need for Morrowind! - Rename the xEdit.exe that you just moved into the TES3View folder to TES3View.exe like so:

- You can delete the other contents from the xEdit.4.1.4c.EXTREMELY.EXPERIMENTAL.7z archive.
Now we need to register TES3View in MO2, the same way we did for Wrye Mash.
Start MO2, and click the Executables button to bring up the “Modify Executables” window again. Select “Add from file…” and navigate to TES3View.exe in Morrowind Mods\TES3View. Select it and click “Open” to add it, and now you’re back on the “Modify Executables” window. Name it TES3View in the “Title” field and click the “…” button to the right of the “Start in” field. In the window that opens, navigate to your main Morrowind folder (where Morrowind.exe is) and choose “Select Folder.” Since I’m using a Steam installation, mine looks like this:
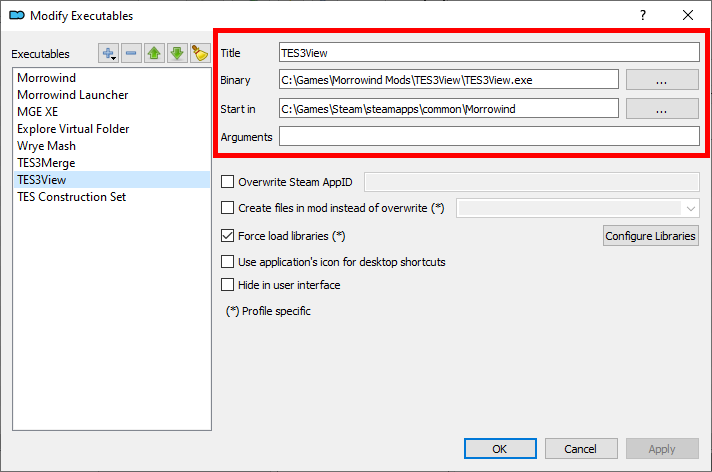
…And you can also see some other stuff in the left side that I haven’t told you to install yet, oh well. Click the “Apply” button and TES3View is now ready to use! You can pick it from the same large dropdown menu you run Morrowind and Wrye Mash from.
Why Did We Have to Select a “Start In” Location?
Once in a while, you may register a tool in MO2 that doesn’t automatically know where your relevant Morrowind files are. Most of them are good at finding the right directory on their own, but some are more fiddly than others. I didn’t need to add the “Start in” location for Wrye Mash, but if an .exe won’t run through MO2 for you, there’s a chance it can’t find the right folder and you may need to set this path manually. It’s usually the Morrowind folder.
So if one of the programs you run through MO2 doesn’t work or reports errors that it can’t find your mods, modify the executable to add your Morrowind folder to the “Start in” location. Remember to click “Apply” to save the changes.
TES3Merge
TES3Merge is a dedicated tool specifically for merging conflicting edits in mods, and you will eventually use to create a “Merged Objects” patch to help iron out mod conflicts. If you are familiar with Wrye Mash’s “Mashed Lists” feature or TES3cmd’s “multipatch” feature, it’s good for you to know that TES3Merge has made these obsolete.
Let’s get TES3Merge installed and set up with MO2.
- Close MO2.
- Visit .NET 6 Runtime and look for .NET Desktop Runtime 6.0.16 on that page, and click the x64 under Installers. Run the .exe you just downloaded to install it.
- Visit TES3Merge on the Nexus and download it via “MANUAL DOWNLOAD.”
- Make a TES3Merge folder in your Morrowind Mods folder, extract the downloaded TES3Merge archive, and move its contents into the TES3Merge folder you just made.
- Now, register TES3Merge in MO2 by following the same instructions you used for Wrye Mash and TES3View. I don’t think you need me to run through this step-by-step again — just refer to the above screenshots if you need a reminder. Remember to name TES3Merge properly in the “Title” field and set its “Start in” location to your Morrowind folder.
We’re done installing all our tools and getting them set up in MO2! Now let’s look at installing, configuring, and managing mods.
Step 6: Installing and Configuring Mods
At this point, let’s take stock of where we are in relation to the main modding guide: You’ve already done everything in Parts 1 through 3 of (Re)installing Morrowind, and if you followed my directions here, you’ve read the information in those entries that is pertinent to you. You’ve also done a bit of Part 5 unless you skipped the MO2 tutorial. Now you should read (or at least skim) Mod Installation Best Practices for some important basics about mods, how to see their documentation, and information about saving the installers and archives of the utilities and mods you download. When you’re done with that, come back here.
Back? Okay, cool. We’re going to do something else from Part 5 now!
During the initial MO2 installation process, I suggested you follow the built-in tutorial that showed you how to install and activate mods. At that time, you were to install Playable Uncompressed Vanilla and Expansion Textures, but if you didn’t, it’s time to install it now. I’m going to summarize the instructions again in case you opted out of the tutorial (if you already installed this just skip the below five steps):
- Visit Playable Uncompressed Vanilla and Expansion Textures and click the “FILES” tab. In the “MAIN FILES” section, click “MOD MANAGER DOWNLOAD.” Free Nexus accounts can only choose “SLOW DOWNLOAD” from the page that comes up.
- If a small “Register?” window pops up asking if you would like to associate Mod Organizer 2 with nxm links, click “Yes.” If you don’t see this window, mouse over MO2 in your taskbar to see if the message is hiding behind the MO2 window or minimized.
- If you get a similar message in your web browser, tell it to always allow this and agree to this too. The mod will then start downloading and is visible in MO2’s “Downloads” tab in the right-hand pane.
- Double-click the mod’s downloaded archive in the “Downloads” tab to install it. A “Quick Install” window will appear; just click “OK.”
- When it’s finished installing, you’ll see the mod appear in the left pane of MO2. Check its checkbox to activate it.
If you don’t know what Playable Uncompressed Vanilla and Expansion Textures does, I explain in the Patch for Purists and Load Order guide entry in the “Improving Fidelity of the Vanilla Graphics” section. Read that section if you wish (don’t follow that entry’s directions to install it though, you just did that) and then return to this tutorial. You can also continue down through the “Patching Bugs that Remain in the Game” down through “Installing Patch for Purists” sections to learn more about the next mod we’re going to install, but don’t follow any of the actual installation instructions in that guide entry because we are about to do that here.
Now we are going to install Patch for Purists (PfP).
- Visit the PfP page I just linked and download the main file using “MOD MANAGER DOWNLOAD.”
- Double-click the archive in MO2’s “Downloads” tab and click “OK” on the “Quick Install” window.
- Activate the mod in the left pane of MO2 by checking its box.
- Select the “Plugins” tab in MO2’s right-hand pane to see the new PfP plugin files you just installed.
Patch for Purists comes with three plugin files:
- Patch for Purists.esm
- Patch for Purists – Book Typos.ESP
- Patch for Purists – Semi-Purist Fixes.ESP
You will need to have Patch for Purists.esm active, but the other two plugins contain additional optional changes. Decide which you want to use:
- Patch for Purists – Book Typos.ESP fixes typos and other errors in the in-game books. Optional because some players don’t feel like these need to be corrected.
- Patch for Purists – Semi-Purist Fixes.ESP changes a few things that seemed like they were probably wrong (e.g. some scrolls inexplicably weighing 1.0 when most weigh 0.2) but some are more ambiguous than others. Optional because some players prefer these to remain unchanged.
If you want to learn more about these patches, you can read the documentation included with the mod (and I’ll show you how to find this from inside MO2 in a moment). I also describe them in the “Installing Patch for Purists” section in Patch for Purists and Load Order, which you may have read already.
Understanding How to View and Manage Mods in MO2
Okay, PfP is installed and you’re ready to choose which of the optional .esp files you want. Look at the main screen of MO2, and make sure the “Plugins” tab is open on the right side.
Look at the big, left-hand pane of MO2.
Everything in the left-hand pane of MO2 is your install order. This is the order in which Morrowind will load assets from these mods. When you install mods manually by dropping them into your Data Files folder, the mod files will overwrite identically-named files that are already in there (which is why you have to be so careful to prevent overwriting any particular file you’d rather keep, like one really good texture from a mod you are otherwise replacing).
MO2 doesn’t overwrite any files — it keeps every mod in its own dedicated folder. It simulates a manual installation by loading the assets in the order shown in the left-hand pane, from top to bottom, so Morrowind will read the mod files as if they had been overwritten in that sequence.
You can drag and drop mods in the left-hand pane to change the install order. Make sure the contents of the left-hand pane are in this order:
- DLC: Tribunal
- DLC: Bloodmoon
- Playable Uncompressed Vanilla Textures Replacer
- Patch for Purists
If you see a mod in the left pane that has “Unmanaged:” before its name, this means it’s just loose in your Data Files folder. While MO2 can see it, you won’t be able to do much with it, and you should delete it from your Data Files folder and reinstall the mod through MO2 if it’s something you want to use. Unmanaged mods’ plugin files will also appear in the “Plugins” tab whether or not you’ve activated them in the left pane.
Now click on Patch for Purists in the left-hand pane, and you will see a green highlight appear on Playable Uncompressed Vanilla Textures Replacer. This is to show you that PfP is “overwriting” files from the mod highlighted in green. (This is correct; PfP includes some fixed textures meant to replace those.)
Next, click on Playable Uncompressed Vanilla Textures Replacer, and Patch for Purists will be highlighted in red. This means that files in Playable Uncompressed Vanilla Textures Replacer are being “overwritten” by the red-highlighted mod.
So each mod you click on will show you everything that overwrites it, and everything it’s being overwritten by. If you have several mods with some of the same files, you’ll see multiple red and green highlights appear when you click one of those mods.
There is also a small lightning bolt icon to the right of the mods’ names in the left pane. The lightning bolt will have a tiny plus, minus, or both symbols to show at a glance that a mod is overwriting or being overwritten by others. Hovering the mouse on these icons will bring up a tooltip showing what kinds of files are being overwritten.
Now look at the “Plugins” tab in the small, right-hand pane.
The plugins in here are your load order. Load order differs from install order because no matter what order you install the mods in, you can still rearrange the load order of their .esm and .esp files themselves. Generally you want your install and load orders to match in the left- and right-hand panes, although there are rare exceptions.
This is where you activate or deactivate any .esm or .esp files that come with the mods you install. They will load into Morrowind from top to bottom. You can drag and drop them just like in the left pane. Make sure they are in this order:
- Morrowind.esm
- Tribunal.esm
- Bloodmoon.esm
- Patch for Purists.esm
- The two optional Patch for Purists .esp files (they can be in either order)
Playable Uncompressed Vanilla Textures Replacer is not represented here because it does not have a plugin file. It is a “pluginless replacer” that works by putting its texture files into Morrowind’s default structure (simulated in MO2) so the game “knows” to use them before resorting to its own built-in assets. Plugins will also not show up in the “Plugins” tab until you activate the mod in the left-hand pane.
You activate a plugin by checking its box. Make sure Morrowind and its expansions are checked, as well as Patch for Purists.esm and whichever of the optional .esps you want to use. If you would rather not use one or either of the optional .esps, we have a way to hide them from the “Plugins” tab so they don’t clutter it up (we’ll get to that in a minute). If you select a plugin in the “Plugins” tab (by clicking its name, not its box), its corresponding entry in the left pane will be highlighted in purple. The purple highlight will hide any red or green highlights, but you can click an empty part of the “Plugins” tab below the list of plugins to deselect it and remove the purple highlight.
The Mod Information Window
Now look at the left-hand pane again and double-click Patch for Purists. This will bring up an info panel about the mod, seen below.
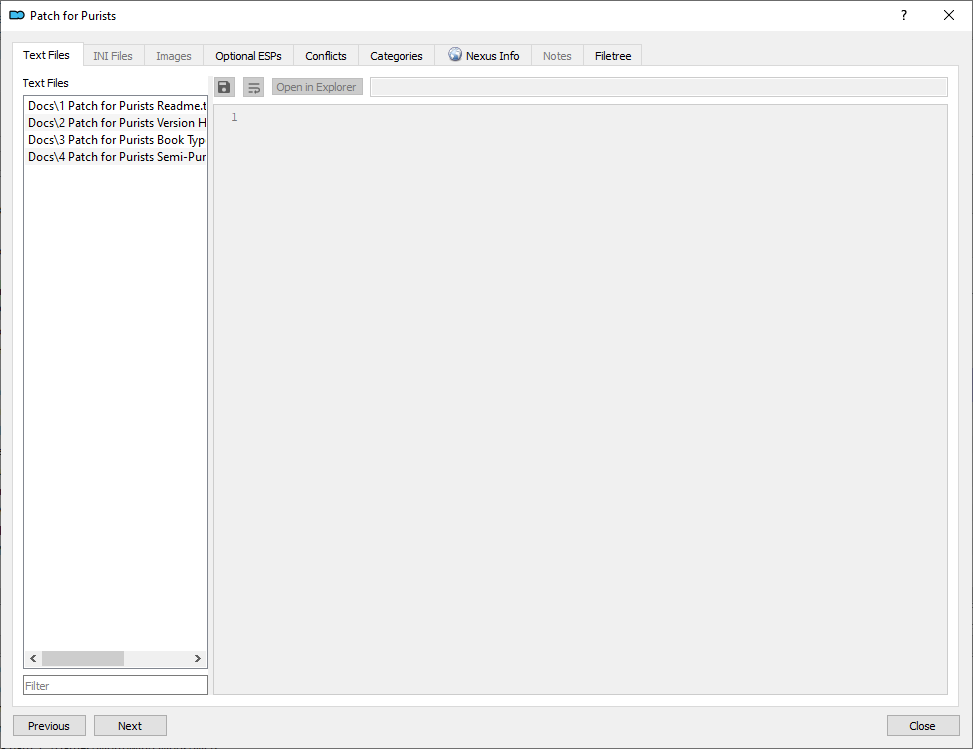
This window has several tabs at the top that let us learn information about the mod and make some minor but important adjustments to how it works. I’ll go through each of these tabs now. The “Previous” and “Next” buttons at the bottom left will switch the info window to the previous or next mod in your install order, not switch among the tabs.
We start on the “Text Files” tab, with a list of all the .txt documentation that comes with Patch for Purists. You can click them in the list to read them in the larger part of the pane. Hovering your mouse over parts of this window will also bring up little informational notes as seen below (which is also common all throughout MO2, and very helpful).
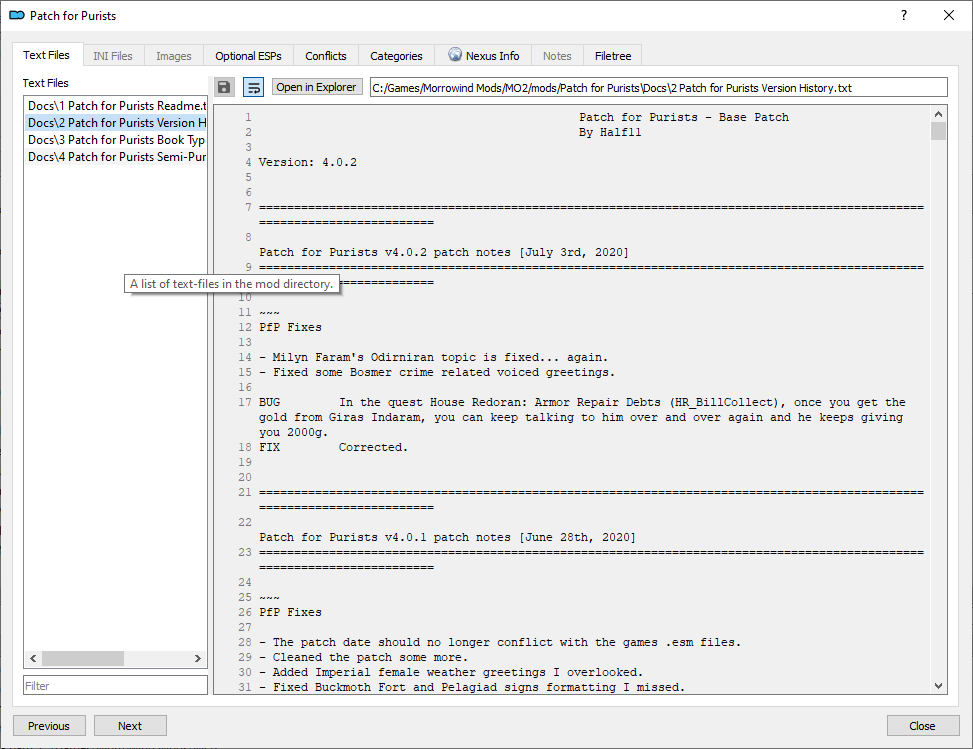
There are three buttons at the top that let you save any changes you make to the file (which you shouldn’t do without a good reason — you don’t want to mess up important mod documentation), turn “word wrap” off and on to make the text fit the width of the panel, and open the file’s location in Windows Explorer (in case you don’t want to read it in this window). You can’t use Ctrl-F in this window to find anything, and it also won’t remember your place in a document, so sometimes you might prefer to read in a text editor.
Next is the “INI Files” tab, which is greyed out for Patch for Purists because it doesn’t come with an INI file. Some mods do, and the INI file is generally where you control some settings, similarly to the edits to Morrowind.ini you made after installing the Morrowind Code Patch.
The “Images” tab would display any images that came with the mod — images for looking at, not textures for loading into the game. Some mods include screenshots in their downloads, but PfP doesn’t have any images, so this tab is greyed out too.
Next is the “Optional ESPs” tab, which is of interest to us. This is where we can hide plugin files we don’t want to use.
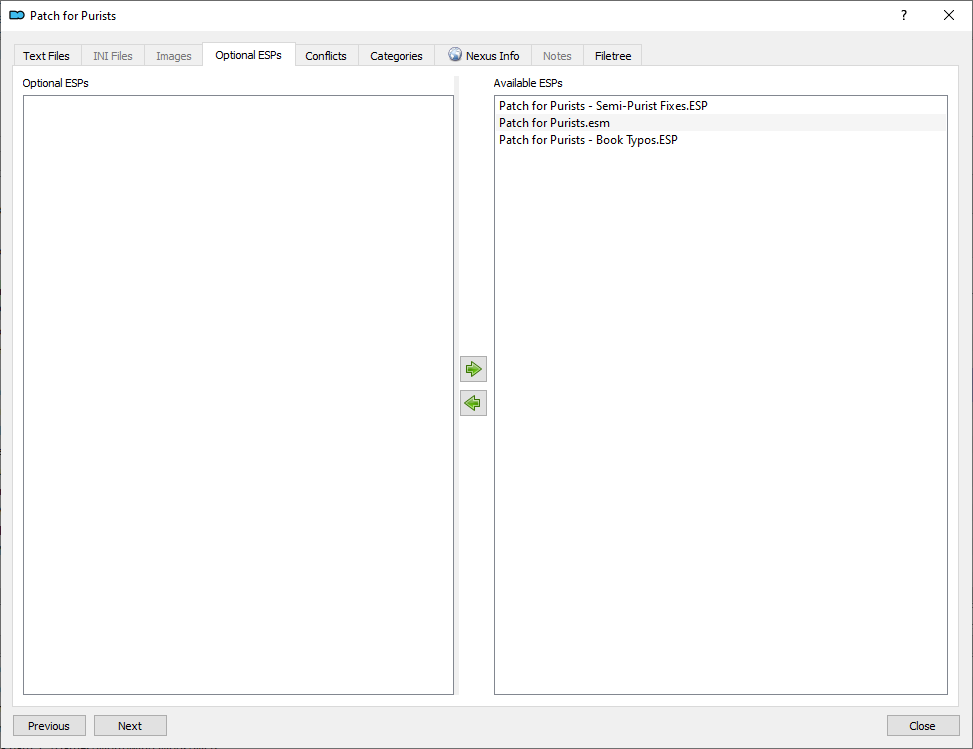
On the left side is a panel for “Optional ESPs” and on the right side are “Available ESPs.” You can select an “available” .esp and move it to the “optional” side by clicking the green arrow button that points to the left. Any files you move over to “Optional .ESPs” will disappear from the “Plugins” tab so you can hide them from your load order and keep it uncluttered.
In my case, I am not using Patch for Purists – Book Typos.ESP but I am using the other two, so I click Patch for Purists – Book Typos.ESP and then click the green arrow button that points left. The .esp file then moves into the “Optional ESPs” pane.
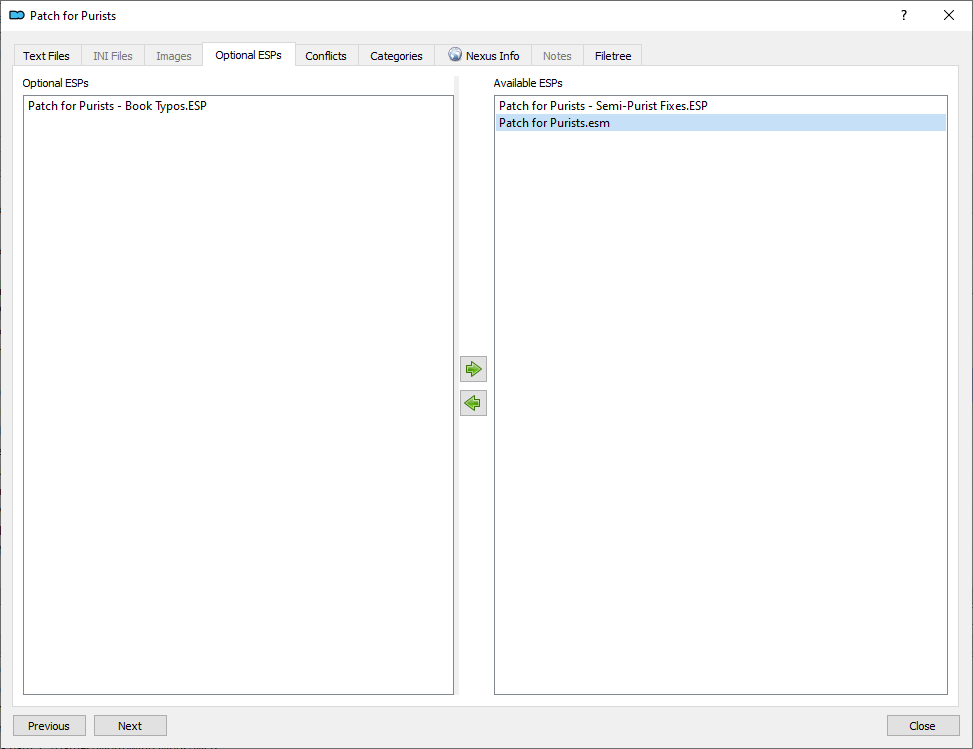
If I change my mind, I can just select Patch for Purists – Book Typos.ESP and click the green right-pointing arrow button to move the file back to “Available ESPs.” Then it will appear in my “Plugins” tab where I can activate it.
Next is the “Conflicts” tab. On this tab we can see the files that Patch for Purists overwrites, and any files that are overwriting Patch for Purists — these are the details behind that red or green highlight that shows up to represent overwrites in the left pane of the main window.
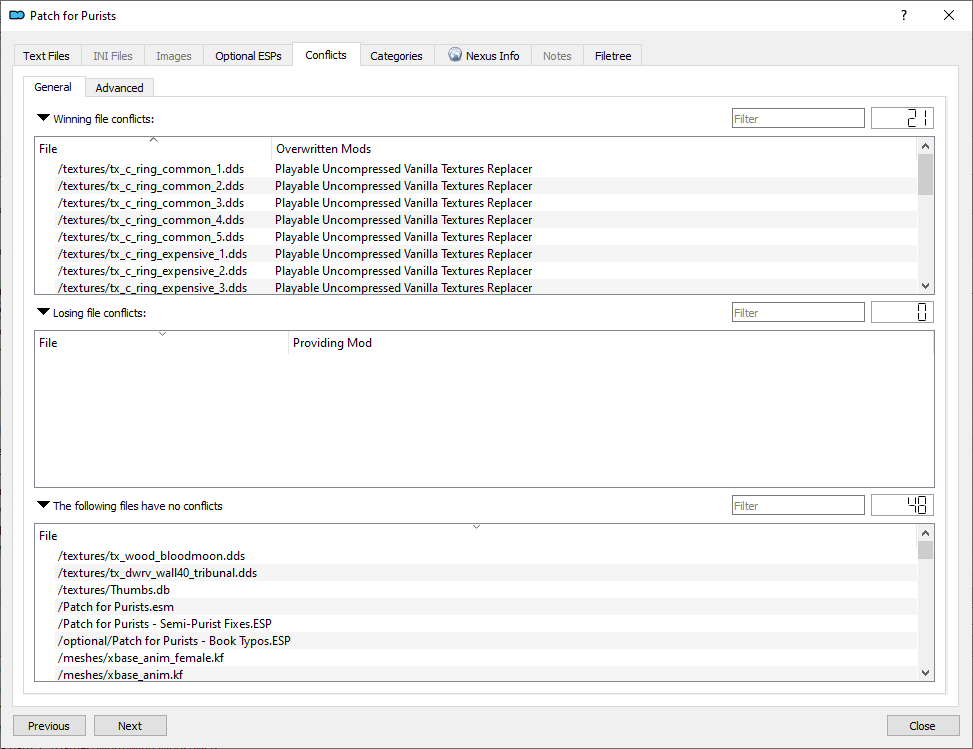
The top panel displays all the files that Patch for Purists is overwriting and which mod they are from. The middle panel would display any files from PfP that are being overwritten by files from another mod, but it’s empty because no mods have been installed after PfP yet. The bottom panel lists the rest of the files in PfP that are not being overwritten. You can click the names of the panels to collapse or expand them, which allows the un-collapsed panels to take up more of the window.
This is one of the most useful windows in MO2 when you’re using a lot of graphics replacers, as it can show you exactly which meshes and textures are being overwritten by others. After installing one or more new mesh and texture mods, you may even see that some of your previous graphics mods now have everything overwritten! This would tell you that you could simply deactivate the older mods or even completely uninstall them because they’ve been fully replaced.
In another scenario, let’s say you’ve installed a texture mod that you like — let’s call it “Textures 1.” Then later, you discover another texture mod that you like (we’ll call it “Textures 2”) and install that one as well. Then you find another we’ll call “Textures 3” and install it too. But then you realize one of your favorite textures from “Textures 1” is no longer appearing, and you start to miss it. But you can bring it back without having to delete or reinstall anything! Here’s how to do that:
- Find the name of the texture that you want to bring back. (This is actually the hardest part, but a lot of textures have something in the name that’s at least a bit indicative of what it is. Some items also use multiple textures, so in those cases you’d have to find all the textures relating to that item. You can also open the texture files with many image programs.)
- Look at the “Textures 1” mod in this window and find the desired texture(s) in the “Losing file conflicts” panel. This will tell you which mod is overwriting that texture. Let’s say you find the texture and it’s overwritten by “Textures 3.”
- Open “Textures 3” in the “Conflicts” tab and you’ll see the overwriting texture up there in “Winning file conflicts.” Right-click the offending texture and select “Hide” from the dropdown menu. MO2 will then hide the texture from the game by appending “.mohidden” to the end of the texture’s name which will cause Morrowind not to see it. (If you want to unhide a texture to bring it back, we can do that too, but I’ll explain that in a bit.)
- Go back to the “Conflicts” tab for “Textures 1.” If the texture you desired is no longer being overwritten, it will be listed in the bottom panel (“The following files have no conflicts”) or in the top panel if it’s actually overwriting something else. If you find it in either of those locations, it’ll show up in your game again!
- But let’s say “Textures 2” was also overwriting it (and in turn being overwritten by “Textures 3”). The texture will still be in the “Losing file conflicts” panel of “Textures 1,” only now it will show that it’s being overwritten by “Textures 2.” So just go to “Textures 2” and hide the file the same way you did for “Textures 3.” If several mods are all overwriting the same file, you’d have to hide that file in each mod to expose the one you want.
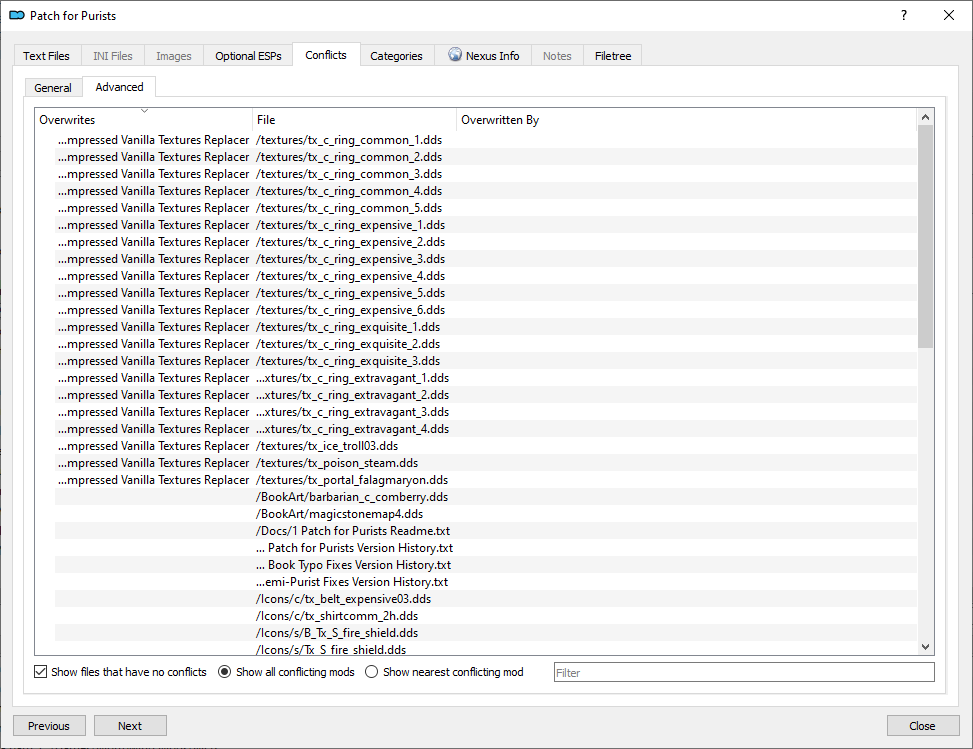
- The “Losing file conflicts” panel only shows you the last mod that is winning the conflict, not all of them. But if you look above the “Winning file conflicts” panel you’ll see that there’s an “Advanced” tab, which provides a different view that does show all the mods that overwrite and the sequence in which they do so. This is very handy for getting a more complete picture of conflicts in your mod list and seeing how many mods are trying to affect the same things.
It’s also important to understand that, in order to hide the correct file, you do need to open the “Conflicts” tab for the mod that contains the specific files you want to hide. You cannot hide a file from “Textures 2” while you are looking at the “Conflicts” tab for “Textures 1.” If you have “Textures 1” open in the “Conflicts” tab and select “Hide” on a file that is being overwritten, it will not hide that file in “Textures 2,” it will hide the file in “Textures 1.” You would be hiding the actual file you were trying to “show” to the game.
By making use of this window, you can pick and choose meshes and textures from multiple pluginless replacers without having to delete or reinstall any files. Just hide the ones you don’t want to use. If you were trying to do this in a manual installation, you’d have to overwrite things in the Data Files folder over and over again whenever you changed your mind about which meshes or textures to use.
The information here can also help you get mesh and texture mods into the most sensible install order. For example if you have one mod that replaces hundreds of textures, and one that only replaces five (and you want to use all five), it makes more sense to put the smaller mod after the larger one to let the smaller mod overwrite naturally, rather than have to hide five textures from the larger mod.
Okay, that’s it for the “Conflicts” tab!
The next tab is “Categories” which provides a way for you to categorize mods in MO2 according to your preferences. Some mods come with categories already defined, although sometimes they’re wrong and seem randomly assigned. This tab includes a list of categories you can check on or off to help organize your mods.You don’t have to, though — if you don’t care about neatly categorizing the mods you use then you can just ignore this tab. Nothing bad will happen.
The tab after that is “Nexus Info” which shows you the mod’s Nexus page within a panel on the tab. You can use this for quick reference rather than opening a web browser, but it isn’t going to look perfect.
Next is the “Notes” tab, which can be very handy! This tab allows you to write your own notes about the mod in question. I strongly recommend using this tab to write down any special instructions you may have needed to follow while installing the mod. The “Notes” tab will be greyed out until you write something in it.
The next tab is the “Filetree” tab. From here, you can see all the files that belong to the mod. If you’ve made one of its .esps optional in the “Optional ESPs” tab, you’ll see it here in a folder called “optional.” All files you have hidden using MO2’s Hide feature will still be in their original folders with .mohidden appended to their names. You can right-click them in here to unhide them if necessary, which will make them visible to the game again. (For optional .esps though, remember you can just move them back to the “Available ESPs” side in the “Optional ESPs” tab.)
The “Filetree” tab is essential for quickly browsing the contents of a mod without needing to find it in the Mod Organizer\mods folder. If the mod came with a readme that isn’t a text file, such as an HTML file, you’ll be able to open it from here. Most mods just come with regular text files these days, but once in a while you’ll find one where the creator basically made a mini web page for their readme. Microsoft Word formats are sometimes used, too.
(the following is in progress!)
BSA Files
Morrowind, Tribunal, and Bloodmoon each store their respective assets in .bsa files, which are a type of archive. Most mods come with “loose files” which are just files in the necessary folders, like the Textures and Meshes folders. The Morrowind engine always checks for loose files before loading anything from a .bsa, which is why mods can so easily override the game’s original assets.
However, some mods also come with a .bsa.
Archives tab
Register BSA
Invalid “Data Files” Structure
Sometimes, when installing a mod through MO2, you’ll get a notification that the content of Data Files does not look valid.
Reinstalling and Removing Mods
To remove a mod, right-click it and select “Uninstall” from the dropdown menu
Keep in mind this will affect your savegame
You can clean saves with Wrye Mash, but keep in mind this won’t prevent 100% of errors depending on the mod. I’ll have instructions for cleaning saves available as well.
To reinstall a mod, you do not have to remove it first. Simply find the mod’s archive in the “Downloads” tab in the right-hand pane and double-click the archive again.
Installing Patches as Separate Files (and Knowing When to Do It)
Some mods have patches available as separate downloads. These could come from the same Nexus page you downloaded the main mod from, a different Nexus page, or anywhere. Patches are made to correct issues in a mod or make others work together.
Sometimes, a patch mod may want to install using the same name as the original mod.
Giving it a different name can help remind you that you actually have it.
If the patch mod is supposed to make two or more mods work together, you’ll need to place it after the mods it affects. In this case, you should always make sure it has a unique name so it will act as a new mod in your install order. You can then place it in the proper location. If it has a plugin file, that will need to be in the right place in the “Plugins” tab, too.
Step 7: Profiles and Separators
For now, we have just been using the “Default” profile of MO2. But MO2 allows you to set up multiple profiles so you can have different mods active for a variety of gameplay experiences.
Step 8: Managing MO2’s Overwrite Folder
The Overwrite folder is a “working area” for MO2. It’s where MO2 spits things out that get generated by various tools or mods — things like MGE XE’s Distant Land, your saved settings for MWSE mods, and other stuff. In a manual installation, these things would get saved into your Data Files folder, but MO2 puts them in Overwrite.
MO2 will show you a warning message if the Overwrite folder has anything in it. Your game will still work with stuff in Overwrite, but you definitely need to know it’s there — the contents of Overwrite will affect all of your MO2 profiles, so if you wanted to have different Distant Land or other MWSE mod settings for each profile, your Overwrite folder would get in the way by affecting them all.
Thankfully, getting stuff out of your Overwrite folder is really easy. You can make a new “mod” from within MO2 and move the appropriate Overwrite contents into it.
PAGE IN PROGRESS – UPDATE IMMINENT!
More Information, References, and Where to Start the Modding Guide
By following this tutorial, and installing the mentioned tools, you have completed Parts 1 through 5 of (Re)installing Morrowind. You probably also read Part 4, if you clicked the link to it when I suggested it.
So now it’s time to learn about all the utilities you just installed, and then get to installing more mods!
Here’s a brief reference of the guide entries you’re already finished with, in case you want to review their contents or need a reminder in the future:
- Part 1: Basic Morrowind Installation – Buying and installing Morrowind; necessary steps for Steam and GOG installations.
- Part 2: Morrowind Code Patch (and More) – More details about some of the choices in the MCP.
- Part 3: Morrowind Graphics Extender (and More) – The basics of MGE XE and the 4GB Patch.
- Part 4: Mod Installation Best Practices – Discussion of mod documentation and saving downloaded archives (and how MO2 does this for you).
- Part 5: Patch for Purists and Load Order – Details about the mods we installed during this tutorial (Playable Uncompressed Vanilla and Expansion Textures and Patch for Purists).
So here’s what’s next!
- Part 6: Dirty Mods and How to Clean Them – Crucial information about cleaning “dirty” mods with TES3cmd via Wrye Mash (both of which we installed in this tutorial). If you’re ready to move forward and want to read through the rest of the guide, go here. You’ll find a link to every subsequent guide entry at the bottom of each as you read through them.
- The entries after that cover the other utilities we installed during this tutorial and then get into the mods themselves.
- Alternately, if you don’t feel like you need detailed information about modding, I’m putting together a summarized version of (Re)installing Morrowind that contains only the basic installation and load order without going into depth like I do in the main guide. I’ll add a link here to that page as soon as I’m ready to publish it live.
You can also refer to my main Morrowind page to see a list of everything I’ve written about Morrowind including all the 2023-updated guide steps (as well as the older ones that still need an update). The ever-evolving update log on that page will also keep you informed of my progress.
I also plan to add an index of other modding guides.
As well as a list of additional resources and documentation for MO2.
Yes, I’m updating this page as fast as I can; I’m just also juggling it with the main guide entries that are a lot more urgent in some of my readers’ eyes. <3
